The HTX-202 and HTX-404 will eventually refuse to work and just flash er1 on the screen. This is due to the small coin size battery inside the radio failing. It is a pretty easy and straight-forward repair requiring just a few tools and a new battery.
The best place to get a new battery for your HTX-202 and HTX-404, and a few pieces that make the whole thing a lot nicer, is the great little kit by Frank, WDX2RADIO. It includes the battery in a holder, two pieces of color-coded shrink wrap, and some double-sided tape along with printed instructions.
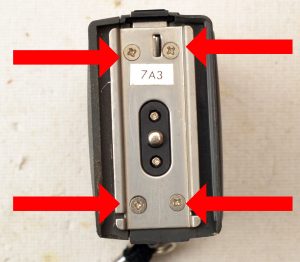
To start with, turn the HTX-202 or HTX-404 off and remove the battery. You should also remove the antenna. Turn the radio upside down and remove the four screws on the bottom as shown in the next image.
Be sure you keep the radio upside down when removing this plate as there are loose parts underneath. Also, make sure you look very closely at how these parts are put in place as reassembly will be a real pain if you do not put these in properly.
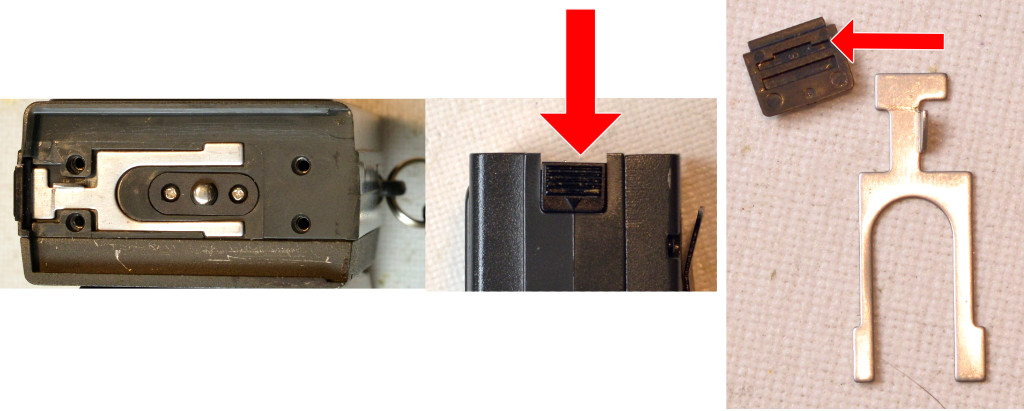
In the below series of images, the first image shows the correct placement of what I call the wishbone. Note it has a thick side and a thin side, make sure you get these in right.
In the second panel, the arrow is showing you that the little release button sits below the sides of the case when installed properly. Also, note that the little arrow molded into the side of the little release button points towards the top of the radio and not towards the battery.
In the last panel note that the back of the release button has two grooves that the wishbone piece can sit in, you want to insert the end of that wishbone into the top (as far as that image is concerned) groove where the arrow is pointing. If you insert it into the other one you will never get the battery to latch into place.
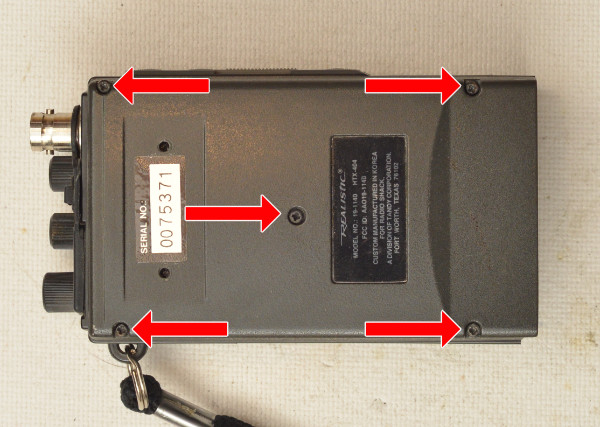
Now remove the five back cover screws of the HTX-202 or HTX-404 as shown in the image below.
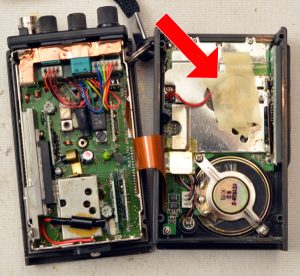
Slowly pull the two halves of the radio apart and be careful. There is a flat cable that connects the two halves together, be sure not to damage this cable. To pull the halves apart, start at the top and pull that apart first, then tilt the parts away from each other keeping the bottom together. You will need to lift slightly on the back part to get that bottom battery contact to come up and out.
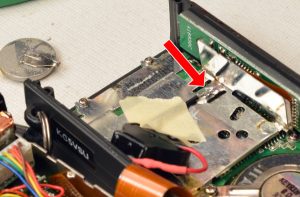
Now you should see the old battery attached to the front half on a metal shield above the speaker shown in the next image.
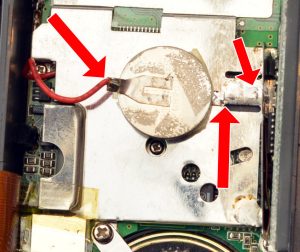
Remove the tape if there is any and you should see something like in the following image. The top left arrow shows where you are going to cut the red wire so you can attach the new battery. The top right arrow shows where the bottom negative contact on the battery was soldered originally and the bottom right arrow shows where the lead from the negative terminal on the battery is.
This is the way my radio was, broken loose. We bought this radio brand new back in 1996 and it has never been dropped or banged and indeed except for some dust and dirt looks almost brand new so I have no idea how this happened. A little reading online and it seems I am not the only one to have this happen.
So whether the battery died or disconnected really doesn’t matter, either way, it has been in there for fourteen years so it is getting a new battery.
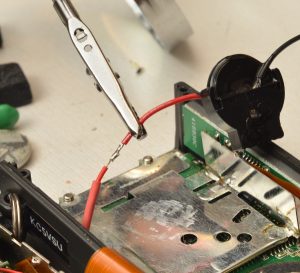
Cut the red wire where indicated and carefully strip a little wire back. Be extremely careful stripping the wire, there isn’t a lot of wire in the radio and if you mess it up it will be a pain to replace. I used an X-acto knife to carefully score the insulation and then remove it. I then slipped the included red shrink-wrap over the red wire as far down as it would go.
I then used a set of Helping Hands to hold the wires together while I soldered them. You need to work fairly quickly here as the shrink-wrap is close and will easily start to shrink if you take too long.
I use a 40 watt Elenco Soldering Station for this work and it does an excellent job.
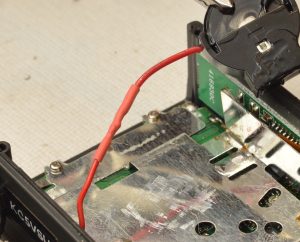
Once the solder joint is cool, and not before, slide the shrink-wrap up over the solder connection and then heat it to make the connection permanent.
Now bend over the portion of the black wire that is pre-stripped to make a rather large area to solder to the metal and hold it in place with a piece of tape while you solder it to the metal. Once it is cool you can remove the tape.
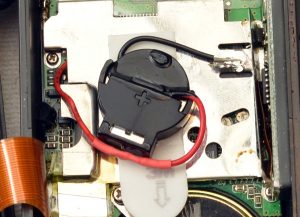
Use the double-sided tape, or in this case 3M command strip, and attach it roughly where the old battery was making sure to keep the wires as out of the way as possible. I found that I could wrap the wires around the battery and stick one part of the black wire to the tape to help hold it in place.
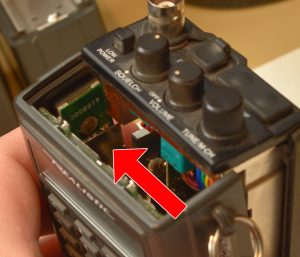
When putting the two pieces of the radio back together there are two things to watch; first that you insert the bottom first so you can get that little BB looking battery connector in the hole where it goes, and second that there is a piece of the shield that kept me from closing the top.
That shield is shown in the image below and you need to push it gently in the direction the arrow is pointing, or towards the left side of the radio as the LCD is facing you. You just need to push it maybe a quarter of an inch or so and then the radio will close right up.
Finish reassembling the radio in the reverse order which you took it apart. Be careful with the back cover screws most of them screw into plastic and will strip very easily. Tighten just enough to eliminate any room between the screw head and plastic and hold the radio together.
The last thing you have to do is reset the radio. This is accomplished by attaching a charged battery or AC adapter, hold the F (top button on the left side above the PTT button) and D key (on the front, bottom right) while you turn the radio on. The radio will beep a couple of times and then you should see this:
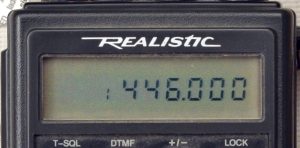
You will of course see a different frequency displayed if you are working on an HTX-202 instead of this HTX-404. Your radio is back up and running with no more er1 error! Enjoy!
Of course, the next problem is that your battery is probably dead. Fortunately, these radios were so wildly popular that the battery packs are still available. Personally I have a couple of the Ni-Cad packs and three AA battery packs just to make sure I can keep on transmitting.


Nice Job!
Thank You !
I wish I’d have known about this fix years ago. I had an HTX-404 that I had won at a hamfest, that kept flashing “ER-1”. Many fellow hams told me that was the PLL unlocking, and I wouldn’t be able to use the radio. I’ve had plenty of HTs since then, though, so that old HT isn’t missed.
Just wondering if the digital display operation will be restored with new 3 vt internal battery ?
If the display does not work at all, then I would suspect not. My display worked but the radio just displayed the er1 error message.