
I’ve been watching OpenGD77 firmware gain serious traction among ham radio operators lately. It’s not surprising – this custom firmware is turning into the first choice for folks looking to get more out of their DMR radios. With tutorial views numbering over 12,000, it’s clear I’m not the only one noticing the surge in popularity.
So what’s all the fuss about? Simply put, OpenGD77 takes your standard DMR radio and transforms it into something far more useful for amateur radio operation. Unlike the stock firmware that comes with these radios, OpenGD77 is built specifically with ham operators in mind.
One thing I really appreciate is how quick it is to set up. Users report creating a codeplug in under 20 minutes – a process that can be frustratingly complex with factory firmware. That alone makes it worth considering.
The compatibility is impressive too. Whether you’ve got a Radioddity GD-77, a Baofeng DM-1801, an RD-5R, or several other models, OpenGD77 works across the board. This means you don’t need to shell out for an expensive new radio to get these improvements.
What makes OpenGD77 really shine in day-to-day use is how it simplifies common tasks. Want to switch between talk groups? Simple. Need to adjust power settings? Easy. These operations that can be cumbersome with stock firmware become straightforward and intuitive.
Even for operators who aren’t technically inclined, the user interface makes sense. Tasks like entering talk groups and managing contacts suddenly feel logical rather than like deciphering a secret code.
I should mention that OpenGD77 isn’t static – it’s constantly evolving. The developers regularly incorporate feedback from users, which means the firmware keeps getting better. Each update brings new features that you’d typically only find in much more expensive commercial radios.
What is OpenGD77 and How It Replaces Stock Firmware
Let me break down what OpenGD77 really is – it’s essentially a complete replacement for the factory software that comes with several popular DMR radios. This isn’t just a tweak or minor improvement; we’re talking about a ground-up redesign specifically built for ham radio operators rather than commercial users.
OpenGD77 vs Stock Firmware: Key Differences
I’ve used both stock firmware and OpenGD77 extensively, and the difference is night and day. The blunt truth that many experienced users acknowledge is that “the stock firmware on both GD-77 and DM-1801 sucks!”. Strong words, but after using both, I’d have to agree.
Here’s where OpenGD77 really shines compared to what comes from the factory:
User Interface and Operation The stock firmware feels like it was designed for business users with no thought for ham operations. OpenGD77 flips this completely – the interface makes sense for amateur radio use. One huge improvement is being able to scroll through talk groups without creating new channels for each one. This alone saves hours of programming time.
Programming Flexibility With stock firmware, I always felt tethered to my computer. Need a new talk group? Back to the programming cable. OpenGD77 changes this entirely by letting you “practically program the radio without relying on a computer (except for zones and TG lists)”. This on-the-fly programming is a game-changer in the field.
DMR Functionality The DMR improvements in OpenGD77 are substantial:
- You can enter talk groups directly from the keypad – no pre-programming needed
- Monitor mode lets you hear transmissions across different Color Codes and TimeSlots
- Overriding the current TalkGroup takes just a simple key sequence
- Scanning is dramatically faster and more responsive
Hardware ControlBattery management gets a serious upgrade with power level adjustments “from 50 mW to 5W and beyond“. This is perfect when I’m working through a nearby hotspot and don’t need full power blasting away my battery life.
What Does OpenGD77 Do for DMR Radios?
Beyond fixing what’s broken in stock firmware, OpenGD77 adds completely new capabilities that transform these basic radios into something much more versatile.
Simplified Talk Group Management The stock firmware approach of “one channel per talk group” always drove me crazy. OpenGD77 flips this model by letting you:
- Set up just one channel for each repeater or hotspot
- Scroll through all available talk groups with simple button presses
- Select contacts directly from your list using left/right keys
- Toggle TimeSlots with a single press of the * key
Enhanced Reception Capabilities I’ve found the listening experience totally transformed with OpenGD77. The firmware “is filtering the TimeSlot only” by default, which means you “will be able to listen to any TG that your repeater is spitting out”. This open listening approach makes monitoring activity much more informative than the locked-down stock firmware.
Hotspot Integration One feature I particularly love is the built-in hotspot capability. Your radio can actually function as a DMR hotspot when connected to a computer running MMDVMHost, Pi-Star, or BlueDV. The stock firmware simply can’t do this.
Amateur-Specific Features OpenGD77 strips away useless commercial features like encryption while adding capabilities ham operators actually need. As another user perfectly put it, “So far, I haven’t seen a single DMR radio that is solely designed and built for the needs of an amateur, other than OpenGD77”.
Enhanced Audio and Performance The audio improvements are immediately noticeable. DMR Rx AGC (Automatic Gain Control) means clearer reception, and the enhanced scanning functionality makes finding active channels much faster.
The bottom line is that OpenGD77 transforms these radios so completely that it’s hard to go back to stock firmware. Many operators now consider it essential software – “If you are going to be using a GD-77 as a ham you need to use this firmware”. From what I’ve seen in the ham community, this sentiment is widespread, with users consistently reporting that OpenGD77 “blows the socks off the stock firmware for the radio”.
Top Reasons Ham Operators Are Switching to OpenGD77
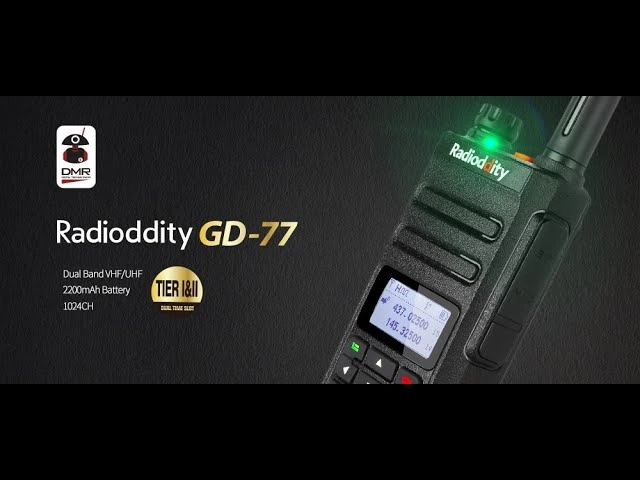
Image Source: YouTube
I’ve seen a huge shift toward OpenGD77 firmware among ham operators lately, and for good reason. After experimenting with it myself, I understand why so many are making the switch from stock DMR radio firmware. The improvements aren’t just cosmetic – they solve real problems that make DMR operation frustrating for amateur use.
Improved Manual Talk Group Entry
Talk group selection is probably my favorite upgrade in OpenGD77. It’s dead simple:
- Press the Hash (#) key to enter any talk group number right from the keypad
- Hit the Green key to confirm your selection
- The radio shows the talk group name automatically if it exists in your Digital Contacts
You’ll notice a tiny 1-pixel box around the TG area after manual entry, showing you’re using a manually entered talk group. This might seem like a small thing, but it’s huge in practice. No more programming every possible talk group into channels beforehand!
One operator I know called this feature “terrific” and said it “makes OpenGD77 worth the price of admission.” It lets you “watch and listen to the Hoseline and jump into conversations on an ad hoc basis”. I couldn’t agree more – this single feature changed how I use my radio completely.
Simplified Power Level Control
Power management on stock firmware can be a headache. With OpenGD77, it couldn’t be easier:
- Function + Right bumps up your power
- Function + Left brings it down
The granular control is impressive too. You get settings at 50mW, 250mW, 500mW, 750mW, 1W, 2W, 3W, 4W, 5W, and even 5W++. Why does this matter? Battery life! When I’m working through a nearby repeater or hotspot, I can dial down to just 250mW and my battery lasts all day.
That 5W++ setting is a nice ace in the hole for emergencies – it pushes about 5.5W on 70cm and 7W on 2m bands. More than the factory ever intended!
What I really appreciate is the dual approach to power control – there’s the Master power setting affecting everything, but you can also set custom power levels for specific channels. When you’ve got a custom power setting, it shows up in bold so you know right away.
Time Slot Switching with One Button
DMR operation gets vastly simpler with OpenGD77’s time slot handling:
- Press the Star (*) key once to flip between TimeSlot 1 and TimeSlot 2
- Press and hold Star to clear a TimeSlot override
Simple. This one-button approach means I don’t need to remember which time slot goes with which talk group anymore. The firmware even lets you assign specific time slots to digital contacts in your codeplug.
Here’s a neat trick: with DMR filtering disabled, the radio can automatically set the correct talk group and time slot during reception just by clicking the SK2 button once while receiving. This lets me focus on the conversation instead of menu-diving.
Enhanced Hotspot Compatibility
This might be the sleeper feature that not enough people talk about. OpenGD77 turns your radio into a powerful DMR hotspot with these options:
- MMDVM mode works with Pi-Star or other systems using MMDVMHost
- BlueDV mode pairs with BlueDV software
If you’ve got the GD-77S model, just press and hold the black button (SK1) when turning on the radio for MMDVM mode, or black button plus PTT for BlueDV mode.
The big advantage? Unlike typical hotspots with their tiny power output, an OpenGD77-powered hotspot can transmit at serious power levels, giving you substantially more coverage.
All you need is the radio connected to a computer via USB. This higher power capability makes these hotspots incredibly valuable for portable or emergency use where those little nano-hotspots just won’t cut it. During events, I typically run mine at about 1W with a better antenna, getting impressive range while still having reasonable battery life.
OpenGD77 Features You Won’t Find in Stock Firmware
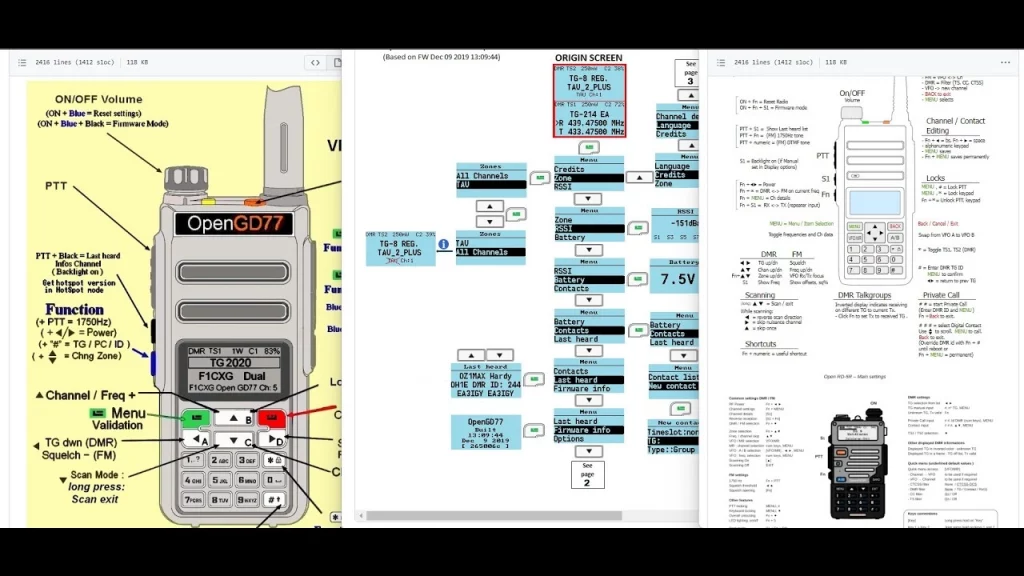
Image Source: YouTube
What really gets me excited about OpenGD77 are the features you simply won’t find in stock firmware. These aren’t just minor improvements – they’re completely new capabilities that transform what your radio can do. In my experience, these additions bring functionality you’d typically only get by shelling out for expensive commercial radios.
Private Call and Echo Function via Keypad
Let me tell you about one of my favorite features – direct private calling. With stock firmware, making a private call is a pain. You’d need to pre-program every single contact you might want to reach. With OpenGD77, it’s ridiculously simple:
- Just press 0 and punch in any DMR ID
- Enter the number right from the keypad
- Connect immediately – no pre-programming required
I use this all the time for echo testing too. Press 1 followed by the Green key and you’re connected to an echo test service. Speak your piece, and the system plays it right back to you. It’s perfect for checking if your audio sounds clear without having to bother another operator. No more programming echo test contacts into your codeplug!
Real-Time Battery and Signal Monitoring
The battery and signal monitoring in OpenGD77 blows away what you get with stock firmware. Instead of those vague battery bars that suddenly drop from “full” to “dead,” you get exact voltage readings. This has saved me from unexpected shutdowns more times than I can count.
When I’m connected to DMR networks, I can see my Bit Error Rate (BER) percentage in real-time. If you’re not familiar with BER, it’s basically a measure of how clean your signal is – under 1% is excellent. This gives me objective data rather than just guessing if my transmission is getting through clearly.
The color-coded signal strength indicators are another game-changer. Green for strong, yellow for moderate, red for poor – it’s like having a visual traffic light that tells me instantly if I need to adjust my position or power.
Custom Boot Screen and Display Settings
The personalization options in OpenGD77 are fantastic. I’ve got my callsign on my boot screen, which not only looks cool but helps identify my radio if I ever lose it at a ham fest.
But the customization isn’t just for show. The color theme settings are actually practical – I’ve tweaked mine for maximum visibility in bright sunlight, which is when I do most of my operating. You can create your own color schemes or choose from built-in themes.
For those of us with aging eyes (I reluctantly include myself here), the ability to increase text size is a blessing. I no longer need to squint or reach for reading glasses just to see who’s calling.
Satellite Mode Support for Amateur Use
This feature absolutely floored me when I first discovered it. OpenGD77 adds satellite operation capabilities to basic DMR radios! The firmware includes Automatic Doppler shift compensation that adjusts your frequencies in real-time as satellites pass overhead.
Before OpenGD77, working satellites meant constant manual frequency adjustments as the satellite moved. Now the firmware handles these calculations automatically. It even includes presets for popular birds like SO-50 and AO-91.
I find it incredible that this firmware essentially turns a $60-90 radio into a functional satellite communication device. You’d typically need to spend several hundred dollars for dedicated equipment with these capabilities. For hams interested in satellite work, this feature alone makes OpenGD77 worth installing.
Compatible Radios with OpenGD77 Firmware
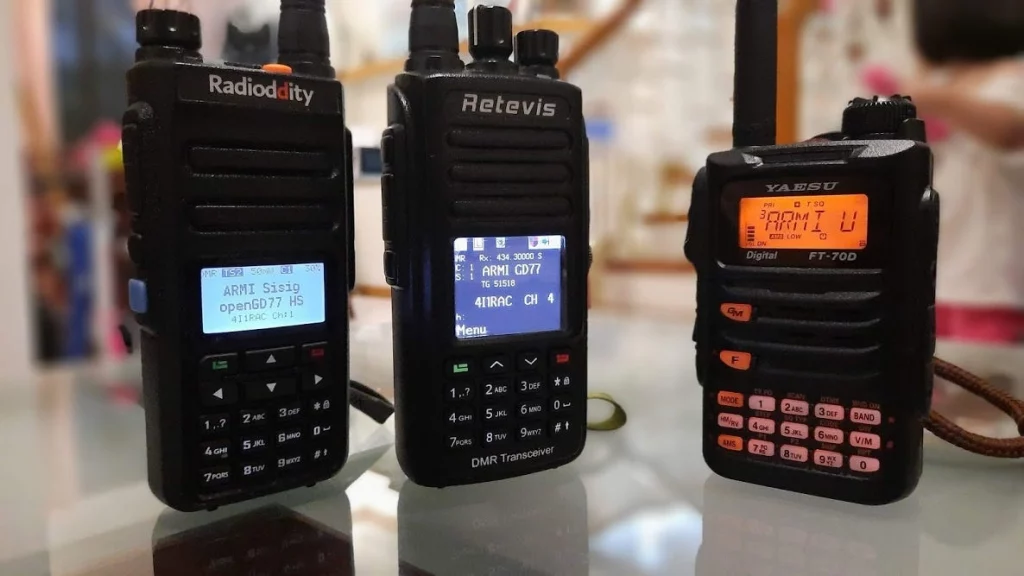
Image Source: N2RAC
If you’re thinking about jumping into the OpenGD77 world, the first thing you need is a compatible radio. Fortunately, there are several options at different price points, though availability can be hit or miss these days.
Radioddity GD-77 and GD-77S
The Radioddity GD-77 is where it all started – it’s the original radio that OpenGD77 was developed for. I like this dual-band handheld because it covers both VHF (136-174 MHz) and UHF (400-470 MHz), making it versatile for pretty much any DMR application you might have in mind. The standard version comes with a full keypad and display, giving you access to everything OpenGD77 can do.
There’s also a stripped-down version called the GD-77S. Despite having fewer buttons and no display, it still works great with OpenGD77. The developers made special accommodations for its limited interface. For example, GD-77S users can activate hotspot mode by holding down the black button (SK1) when powering on.
The tricky part is actually finding a new GD-77 these days. They’re getting harder to come by, with many suppliers listing them as out of stock or backordered. As one ham put it, “getting the original GD-77 is nearly impossible except as used, and Radioddity is not promising when they will have more.” If you’re determined to get something similar, look for the Chinese market TYT MD-760 – it’s basically the same radio with different branding.
Baofeng DM-1801 and RD-5R

If you’re on a budget, the Baofeng DM-1801 might be your best bet. At around $65, it’s about 30% cheaper than the GD-77’s typical $90 price. I’ve used both, and once you load OpenGD77, they’re practically identical in performance.
A fellow ham I know who owns both radios told me, “The GD-77 and DM-1801 are essentially the same radio. The DM-1801 has more memory but is supposedly a cost reduced version of the GD-77. I own both and they operate identically.” This makes the DM-1801 particularly appealing if you’re just getting started with DMR or OpenGD77.
The Baofeng RD-5R (sometimes called the Tier II variant of the DM-5R) is another option that works well with OpenGD77. It’s more compact than the others, which some operators prefer. Unfortunately, these are getting harder to find too. Last time I checked, most US suppliers that still list them show “out of stock” or “back order.” This is probably just as well as these radios tend to get terrible reviews.
One important warning: stay away from the “new 2022 DM-1801” if you want to use OpenGD77. Baofeng redesigned this model with different hardware that’s not compatible. They’ve “completely redesigned their DM-1801 to use a single module, which replaces the CPU, RF and DMR chip,” probably to “future proof themselves by no longer using any components from outside china.” Unfortunately, this means newer units won’t work with OpenGD77.
Retevis RT3S and Baofeng DM-1701

The Retevis RT3S is a more recent addition to the compatible radio lineup. When OpenGD77 first added support for it, the firmware was considered “Alpha” with the developer warning that “not all functionality from the OpenGD77 is included and that the firmware will have many bugs.” Good news though – development has continued, and recent releases fully support this model.
I’ve talked with several operators who run OpenGD77 on the RT3S, and they all report major improvements over the stock firmware. One told me the firmware adds “many features and enhancements” including “a more user-friendly interface with customizable menus and colors” and “better scanning performance with faster scan speed and priority scan.”
Rounding out the handheld options is the Baofeng DM-1701 (also sold as the Retevis RT-84). This radio shares the same basic internal architecture as the others, using the NXP MK22 MCU, AT1846S RF chip, and HR-C6000 DMR chipset that OpenGD77 needs to work.

While not mentioned as often, the OpenGD77 website also lists several mobile radios as compatible, including the MD-9600/RT-90, MD-UV380/RT-3S, and MD2017/RT-82. These give you the same OpenGD77 benefits in a mobile or base station form factor rather than a handheld.
The compatibility landscape keeps changing as manufacturers redesign their radios. TYT will likely continue making some compatible models since “the CPU is available,” but other manufacturers might shift to different hardware. My advice? If you’re interested in OpenGD77, grab a known-compatible radio sooner rather than later, before redesigns make newer models incompatible with this excellent firmware.
How to Back Up and Restore Original Firmware
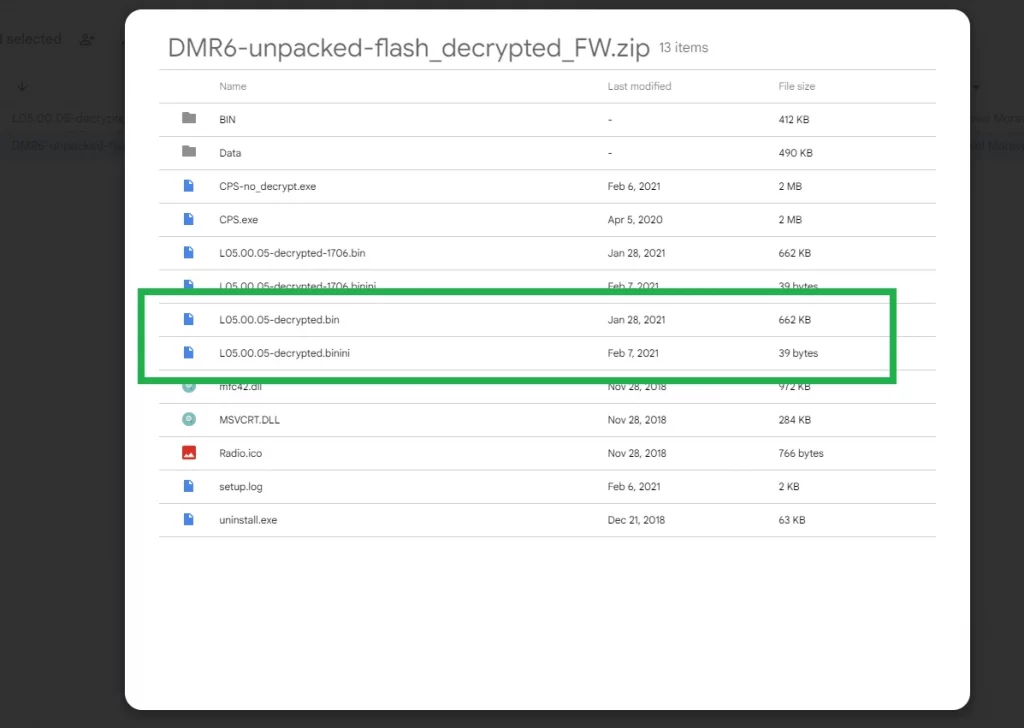
Image Source: Two Way Radio Forum
I can’t stress this enough – if you’re planning to install OpenGD77, back up your original firmware first! Without these backups, you’ll never be able to return to stock firmware if needed. I’ve seen too many hams get excited about installing OpenGD77 only to realize later they can’t go back because they skipped this crucial step.
Using CPS to Save Factory Firmware
This backup process is pretty straightforward, but it absolutely must happen BEFORE you install OpenGD77. Once you’ve installed the new firmware, it’s too late to save your original settings. The OpenGD77 CPS software makes this backup process simple.
Here’s how I back up my radios:
- Connect the radio to my computer using the programming cable
- Turn on the radio and tune to a channel that’s not in use
- Open the OpenGD77 CPS software
- Go to “Extras → OpenGD77 Support”
- Click “Backup EEPROM” and save it with a name I’ll remember
- Do the same with “Backup Flash”
- For extra protection, I also back up the “MCU ROM”
I always save these files in at least two places – my computer and cloud storage like Google Drive. Why? Because if your computer crashes, those backup files are gone forever. As one user bluntly put it, “If you don’t back these up you may not be able to go back to the stock firmware.”
The EEPROM backup contains your radio’s calibration settings, while the Flash backup has the core firmware. The MCU backup is like insurance against catastrophic failures – you probably won’t need it, but you’ll be glad you have it if you do.
Restoring Stock Firmware from Backup
If you decide to go back to stock firmware, you’ll need to follow a specific two-stage process. Trying to take shortcuts will likely brick your radio.
First, you’ll restore those backup files using the OpenGD77 CPS:
Step 1: With OpenGD77 still running on your radio, connect it to your computer. Step 2: Open the CPS software and go to “Extras → OpenGD77 Support.” Step 3: Select “Restore EEPROM” and choose your saved EEPROM file. Step 4: Then select “Restore Flash” and find your Flash backup.
After that, you need to reinstall the manufacturer’s firmware:
Step 5: Get the official firmware update tool for your specific radio. You’ll need different tools depending on your radio – Radioddity for GD-77, TYT for MD-UV380, etc. Step 6: Put your radio in firmware update mode by holding the right button combination while turning it on. Most models use PTT plus the side button (SK1). Step 7: Use the manufacturer’s tool to flash the stock firmware.
Here’s something crucial: NEVER do a factory reset with the manufacturer’s firmware after restoration. I mean never. This will wipe out those carefully preserved calibration settings and potentially brick your radio.
I’ve heard from other hams that some models can be tricky to restore. The DM-1701 firmware is available through Radioddity’s website. TYT radios can be especially finicky – using the wrong firmware version might leave your radio stuck on the splash screen. Not fun.
When done correctly, this process completely reverses the OpenGD77 installation. Your radio will be back to its original state – with all the limitations of stock firmware, but also with manufacturer support intact.
Step-by-Step Guide to Installing OpenGD77
Image Source: YouTube
I’ve installed OpenGD77 on several radios now, and while it might sound complicated, the process is actually pretty straightforward. Let me walk you through how to get this firmware up and running on your DMR radio. Even if you’re not especially technical, you can handle this with a bit of careful attention to detail.
Download Firmware and CPS Software
First things first, you’ll need to gather a few software components:
- Grab the latest OpenGD77 CPS (Computer Programming Software) from the official website
- Download the current OpenGD77 firmware file in .bin format from the same place
- Get what they call the “donor” firmware – for most radios, this will be the official manufacturer firmware like the GD-77_V4.3.6.sgl file or MD9600-CSV firmware if you’re using TYT models
This donor firmware bit is important – it contains DMR codec components that can’t legally be included in OpenGD77. Make sure to save this file somewhere you won’t accidentally delete it, as you’ll need it again for any future updates. I keep mine in a dedicated folder labeled “Radio Firmware” so I always know where to find it.
Enter Firmware Flash Mode
Now let’s get your radio ready for its upgrade:
- Make sure your radio is completely off – not just sleeping
- Connect it to your computer with your programming cable
- Hold down the right button combination while powering on:
- If you’ve got a GD-77 or DM-1801: Press both buttons below the PTT (SK1+SK2)
- For a UV380 or RT-3S: Hold the side button (SK1) and PTT together
- Other models have different combinations – check the OpenGD77 website for specifics
You’ll know you’ve done it right when the screen stays blank and only the LED lights up, usually flashing between red and green. If you’re on Windows, take a look in Device Manager – you should see something called “STM DFU device” under Universal Serial Bus Controllers. That’s your radio in flash mode, ready for the new firmware.
Flash OpenGD77 Using CPS
With your radio waiting in flash mode:
- Open the OpenGD77 CPS and select your radio type
- Go to Extras → Firmware Loader
- Pick your specific radio model from the dropdown
- Click “Select official firmware (donor) file” and find that manufacturer firmware file you downloaded
- Hit “Select Open firmware file & update” and choose the OpenGD77 .bin file
- Now just wait – the installation typically takes 1-2 minutes
One important tip I’ve learned the hard way: don’t unplug your radio or interrupt this process. I once had my computer go to sleep mid-update and had to start all over again. Not fun.
Verify Installation and Reboot
Once everything finishes up:
- Power your radio off and back on again
- You should see the OpenGD77 boot screen appear
- Navigate to Menu → Firmware Info to double-check you’ve got the right version installed
After you’ve confirmed it’s working, immediately back up the Flash memory using the CPS software. I can’t stress this enough – this step saves essential data you’ll need if you ever want to go back to the original firmware. It’s like keeping the box your new shoes came in – you might never need it, but you’ll be glad you have it if you do.
The last step is to upload a basic codeplug to get your radio talking with the new firmware. Then you’re ready to start enjoying all those features that made you want to upgrade in the first place!
Creating and Uploading a Codeplug in OpenGD77
So you’ve got OpenGD77 installed on your radio – great! Now you need to create a codeplug that actually works with it. This is where things get interesting, because OpenGD77 codeplugs work differently than those for stock firmware. I’ve found that understanding these differences makes all the difference in getting the most out of your newly upgraded radio.
Add DMR ID and Call Sign
First things first – your radio needs to know who you are:
- Open the OpenGD77 CPS software and click “DMR ID and Callsign”
- Enter your DMR ID (grab this from https://radioid.net if you don’t have one yet)
- Add your callsign
This is pretty basic stuff, but it’s essential – these details identify you on DMR networks. While you’re at it, I always customize the boot screen by setting display mode to TEXT with my callsign on Line 1 and DMR ID on Line 2. It’s a small touch that makes the radio feel more personal.
Create Talk Groups and Contact Lists
This is where OpenGD77 really shines compared to stock firmware. Here’s how I approach it:
- Create digital contacts (Group Call) for each talkgroup you plan to use
- Decide if you want to assign specific TimeSlots to contacts – this is pretty handy since they’ll override channel settings automatically
- Build TG Lists to organize your talkgroups (you’re limited to 32 per list)
- I usually create separate TG lists for TimeSlot 1 and TimeSlot 2 based on what my local repeaters use
The TimeSlot override feature alone is worth its weight in gold. Stock firmware just doesn’t give you this level of flexibility.
Configure Channels and Zones
When setting up channels, I’ve found this streamlined approach works best:
- Create channels for each repeater with frequency, color code, and the right TG List
- For DMR repeaters, I make separate channels for each TimeSlot (like “W1ABC-1” and “W1ABC-2”)
- Hotspots usually only need one channel
- Group related channels into logical Zones for quick access
The built-in “ALL CHANNELS” zone is always there if you need it, though it can get unwieldy if you’ve programmed dozens of channels.
Upload Codeplug to Radio
Once everything’s set up, getting it onto your radio is straightforward:
- Connect your radio with the USB cable
- Turn the radio on
- In OpenGD77 CPS, click “Program” then “Write”
- Wait for it to finish and the radio to restart
After that, your radio display will show the selected talkgroup at the top, your repeater or hotspot in the middle, and your zone at the bottom. One thing to remember – you might not hear anything right away unless you’re on a channel with active conversations. This confused me the first time, and I thought I’d done something wrong!
The process does take some getting used to, especially if you’re coming from stock firmware. But stick with it – once you’ve done it once or twice, you’ll wonder how you ever tolerated the limitations of the original software.
Basic Usage Tips for OpenGD77 Firmware
Once you’ve installed OpenGD77 and created your codeplug, you’ll want to get comfortable with how this firmware works. I’ve found that spending a little time learning the controls makes a huge difference in daily use. Let me walk you through some of the basics that have made my DMR experience much smoother.
Navigating Menus and Zones
Getting around in OpenGD77 is surprisingly logical. The GREEN key is your main entry point – press it once to get into the menu system. Need to go deeper into submenus? Press it again. The RED key does the opposite – steps back a level or gets you out of menus entirely. I use UP and DOWN arrows to move through menu pages, while LEFT and RIGHT let me change specific items.
Zone management couldn’t be easier. I often need to switch between different groups of channels, and holding the BLUE button (that’s the Function key) while pressing UP or DOWN cycles through zones quickly. One thing I really love is the special “All Channels” zone that OpenGD77 creates automatically. This shows every channel you’ve programmed in numerical order – super helpful when you’re first getting familiar with your radio’s setup.
Switching Between Analog and Digital
Need to flip between FM and DMR? Simple. Press the BLUE button (also called SK2 or Function) plus the Star key at the same time. This works whether you’re in VFO or Channel screens.
When you’re already in DMR mode, the Star key by itself toggles between TimeSlot 1 and TimeSlot 2. This is one of my favorite improvements over stock firmware. If you need to clear a TimeSlot override, just press and hold the Star key until you see confirmation. No more digging through complicated menus to switch time slots!
Using Function Keys for Quick Access
The BLUE side button (SK2) is essentially your primary “Function” key that unlocks a ton of helpful shortcuts. I’ve come to rely on these daily. The ORANGE button brings up quick menus related to whatever screen you’re currently viewing. For instance, in VFO mode, pressing ORANGE twice quickly toggles between VFO A and VFO B.
Want to scan through your zone? Press ORANGE twice while on a channel screen. Need to stop scanning? Hit the GREEN key. The RED key toggles between Memory (Channel) and VFO modes. For those times when you need split frequency operation in VFO mode, BLUE+UP/DOWN shifts focus between receive and transmit frequencies.
Locking PTT and Keypad
I can’t tell you how many times I’ve accidentally keyed up my radio when it was in my pocket with factory firmware. OpenGD77 makes this easy to avoid with comprehensive locking options. To lock the keypad, press the GREEN menu key followed by the Star key. Unlike some stock firmware that leaves you guessing how to unlock, OpenGD77 makes it clear – press and hold the BLUE Function button and press the Star key.
The PTT button gets its own separate lock. Just press the GREEN menu key followed by the Hash (#) key. Need both locked for complete peace of mind? Simply activate both locks one after the other. This has saved me from many embarrassing pocket transmissions during events!
OpenGD77 Firmware: Why Ham Radio Operators Are Switching Their DMR Radios
Conclusion
After spending significant time with OpenGD77 firmware, I’m convinced it represents one of the best upgrades any DMR radio operator can make. Throughout this article, I’ve explained the many ways this custom firmware transforms ordinary DMR radios into something far more useful for amateur radio operations.
What really stands out to me is how OpenGD77 fixes the most annoying limitations of stock firmware. The practical improvements make a world of difference in daily use. Being able to enter talk groups directly from the keypad instead of pre-programming every single one? That alone saves hours of frustration. Toggling between time slots with a single button press instead of navigating convoluted menus? Simply brilliant.
The power management is another feature I’ve come to appreciate. Having precise control from 50mW all the way up to 5W+ lets me extend battery life when I’m near a repeater or boost power when I need extra range. This kind of flexibility just doesn’t exist with factory firmware.
Compatible radios like the Radioddity GD-77, Baofeng DM-1801, and RD-5R give you plenty of hardware options at different price points. I should mention though, radio availability has been getting spotty as manufacturers keep redesigning models. If you’re interested in OpenGD77, grabbing a compatible radio sooner rather than later might be smart.
Yes, the installation process does require following steps carefully, but it’s not rocket science. Even folks who aren’t particularly technical can handle it if they take their time. Just don’t skip backing up your original firmware – that’s a mistake you’ll only make once!
Once you’ve got everything set up, the interface feels remarkably logical. The shortcuts and menu layout make sense in a way that stock firmware rarely does. It’s obvious OpenGD77 was designed by actual ham operators who understand how we use our radios.
The active development community keeps improving the firmware based on user feedback. This continuous evolution means the system gets better with each update, unlike stock firmware that rarely sees meaningful improvements.
If you’re new to DMR, you might initially feel intimidated by digital modes and custom firmware. I certainly was. But most users, myself included, find that OpenGD77 actually makes the learning curve less steep compared to stock firmware. The intuitive interface creates a more approachable experience whether you’re a newcomer or a veteran operator.
FAQs
Q1. What are the main advantages of using OpenGD77 firmware? OpenGD77 offers several benefits, including improved manual talk group entry, simplified power level control, easy time slot switching, enhanced hotspot compatibility, and features not found in stock firmware like private call functionality and real-time battery monitoring.
Q2. Which radios are compatible with OpenGD77 firmware? OpenGD77 firmware is compatible with several DMR radios, including the Radioddity GD-77 and GD-77S, Baofeng DM-1801 and RD-5R, Retevis RT3S, and Baofeng DM-1701. Some mobile radios like the MD-9600/RT-90 are also supported.
Q3. How does OpenGD77 improve DMR operation compared to stock firmware? OpenGD77 simplifies DMR operation by allowing direct talk group entry via keypad, one-button time slot switching, and more flexible channel programming. It also offers enhanced scanning performance and improved audio quality through features like DMR Rx AGC.
Q4. Is it difficult to install OpenGD77 firmware? While the installation process requires attention to detail, it’s accessible to most users who follow the step-by-step guide. Key steps include backing up original firmware, downloading necessary software, entering firmware flash mode, and using the OpenGD77 CPS to install the new firmware.
Q5. Can I revert to the original firmware after installing OpenGD77? Yes, you can revert to the original firmware if you’ve properly backed up your radio’s stock firmware before installing OpenGD77. The process involves restoring the backed-up files using OpenGD77 CPS and then reinstalling the manufacturer’s firmware using their official update tool.