
You can get into digital mobile radio for very little these days, and talk to people around the world without needing fancy equipment or big outdoor antennas. That’s pretty amazing when you think about it. The European Telecommunications Standards Institute created DMR back in 2005, and it’s completely changed what’s possible with ham radio.
I’ve found DMR offers some real advantages over the analog radios I’ve used for years. The two-slot TDMA technology lets two conversations happen at the same time on one 12.5 kHz channel – something impossible with analog. My batteries also last about 40% longer with DMR radios, which is a huge plus when I’m operating away from power sources.
The growth of DMR has been incredible. Last time I checked, there were approximately 5,500 repeaters and 16,000 hotspots connected worldwide, and that number from 2016 has surely grown since then. DMR comes in three flavors – Tier I (no license needed), Tier II (licensed conventional systems), and Tier III (trunked operation). Most hams I know use Tier II. The best part? Even if you only have a Technician class license, you can use DMR.
Getting started isn’t quite as simple as turning on an analog radio, though. You’ll need to wrap your head around some new concepts like DMR IDs, talk groups, and code plugs. Those code plugs (the configuration files for your radio) can take hours to set up right the first time. Trust me, I’ve been there.
This guide will walk you through everything you need to get on the air with DMR in 2025. I’ll cover choosing equipment, programming your radio, and connecting to the most popular talk groups worldwide. Let’s jump in.
What is DMR and Why It Matters in 2025
The European Telecommunications Standards Institute (ETSI) created Digital Mobile Radio as an open international standard back in 2005. I’ve watched it grow from a niche technology into the robust communication platform we see today. It’s amazing how something designed to simply be a cost-effective digital alternative to analog systems has spread across so many different radio services.
DMR as an ETSI Standard Since 2005
What makes DMR special in my experience? For one, it’s a direct replacement for analog Private Mobile Radio. You can use it on existing licensed PMR bands without needing any rebanding or relicensing. This was incredibly smart – it made switching from analog to digital much easier for organizations that already had frequency allocations.
The secret sauce in DMR is something called Time Division Multiple Access (TDMA). This essentially splits a single 12.5 kHz channel into two alternating timeslots. Think of it like having two separate conversations taking turns using the same phone line, but switching so fast you never notice the gaps. This clever approach doubles channel capacity while working with existing frequency allocations.
DMR isn’t just about efficient channel use though. It also gives you:
- Fast call setup capabilities
- Individual and group calling functions
- Emergency and priority call support
- Full duplex communications
- Short data message services
- IP-packet data transmission
The DMR Association has supported the standard since 2005. With over 200 companies involved, they make sure equipment from different manufacturers works together and keep pushing the technology forward. This interoperability is something I really value – I don’t want to be locked into one manufacturer’s ecosystem.
Tier I, II, and III: What They Mean for Hams
DMR has three different “tiers” that serve different purposes. I find this tiered structure makes a lot of sense once you understand it:
Tier I (Unlicensed) is where a lot of people in Europe start. These are license-free radios limited to 0.5 watts in the 446 MHz band in Europe. You don’t need a license, there’s no repeater access, but you still get that crystal-clear DMR audio quality. They are popular for hiking and camping trips with friends – perfect for beginners. These are almost never used outside of Europe, or by amateur radio operators anywhere in the world.
Tier II (Licensed Conventional) is what most of us hams use. This tier was designed to replace conventional analog repeater systems while adding digital capabilities. You’ll need a license to use these frequencies between 66-960 MHz, but you get much more:
- Repeater operation for extended coverage
- IP connectivity for linking multiple repeater sites
- Advanced voice features and integrated data services
- Higher power output compared to Tier I
Tier III (Licensed Trunked) is the heavy-duty professional tier, mainly used by emergency services and commercial applications. It was added in 2012 and introduces trunking, which automatically assigns channels on demand. This maximizes efficiency but requires much more complex infrastructure. I’ve never personally used Tier III, but I’ve seen it in action with our local emergency services.
Why DMR is Gaining Popularity Among Technicians
The digital mobile radio market is growing like crazy. It’s expected to jump from $7.94 billion in 2025 to $12.73 billion by 2029, with a growth rate of 12.5%. Why are so many technician-class operators jumping on board? I can think of several reasons:
Enhanced Capabilities: The voice quality on DMR is simply superior. It filters out background noise and maintains clarity even in challenging conditions. I’ve had clear conversations at the very edge of coverage where analog would have been unintelligible static.
Economic Accessibility: You can get started with DMR for much less money than even five years ago. The equipment ranges from budget to high-end, so there’s something for every wallet.
Network Growth: Thousands of new users join BrandMeister (the largest DMR network) every month. More users means more people to talk to and a more vibrant community.
Simplified Entry Points: Companies like BridgeCom now offer “Plug & Play” packages with both radios and hotspots. This makes getting started much easier than when I first dove into DMR and had to figure it all out myself.
Spectrum Efficiency: That TDMA approach I mentioned earlier makes very efficient use of limited frequency space. This matters more and more as our radio bands get increasingly crowded.
Advanced Features: Beyond just talking, DMR gives you text messaging, GPS tracking, and group calls. These additional capabilities make it feel more like modern communication technology.
I won’t sugar-coat it though – there’s definitely a learning curve when you first get into DMR, especially around programming and setup. But the resources available now are so much better than when I started. As interfaces become more user-friendly, I expect DMR will continue to grow as a cornerstone of amateur radio communication in 2025.
DMR vs Analog: Key Differences and Tradeoffs

Image Source: ResearchGate
I’ve used both analog and digital radios for years now, and the differences between them are pretty striking. While analog has been the go-to for decades, DMR brings some serious advantages to the table – along with a few drawbacks you should know about.
Audio Quality and Signal Clarity
The first thing you’ll notice when switching from analog to DMR is how much clearer the audio sounds. Analog radios pick up everything – including all that background noise you don’t want. I remember trying to talk on my old analog handheld at a hamfest once, and people could barely understand me with all the crowd noise coming through.
DMR does something really clever – it uses digital processing to filter out most of that background racket and focuses on your voice. This makes a huge difference in noisy environments. As one expert put it, “With digital radios, encryption can be used without degrading the quality of the audio, or the range at which the radio works”.
What’s even more interesting is how the signals behave at the edge of coverage. With analog, you get that familiar fade into static as you move away from the transmitter. DMR stays crystal clear until you hit that digital cliff where it just drops out completely. No static, just gone. “Digital radios feature real-time audio processing that focuses on speech and reduces any background noise. This means that the received audio quality is enhanced when compared to an analog radio system”.
Spectrum Efficiency and Time Slot Usage
One of DMR’s biggest selling points is how efficiently it uses spectrum. Thanks to Time Division Multiple Access (TDMA) technology, you get twice the conversations in the same space:
“DMR uses the two-slot TDMA in a 12.5 kHz channel – this means that, as opposed to analog communication, you have two slots for communication instead of one”.
To break this down simply:
- With analog, one channel means one conversation
- With DMR, one channel can handle two separate conversations simultaneously
The time slots switch back and forth so quickly (in milliseconds) that you don’t notice any gaps. It’s really quite impressive when you see it in action.
Learning Curve and Setup Complexity
Here’s where I have to be honest – DMR isn’t as plug-and-play as analog. With most analog radios, you punch in a frequency, maybe a PL tone, and you’re good to go.
DMR requires a lot more setup work. As someone who’s helped plenty of hams get started with DMR, I can tell you the learning curve is real. “Digital products are more advanced than analog radios, and so they aren’t as user-friendly for first-time users. It may take more time to learn and get used to it, similar to getting a new cell phone and learning all the new features”.
You’ll need to connect your radio to a computer, use programming software, and wrap your head around new concepts like talk groups, color codes, and time slots. As one frustrated ham put it: “First you have to figure out all the various FM features of a new HT (which is seldom intuitive) and then you must venture into the DMR morass of programming talk groups, frequencies, offsets, PL and colors”.
Internet requirement vs radio to radio
Another big difference is how these systems connect. Analog is straightforward – radio talks directly to radio or through a repeater. No internet needed. It is also a lot easier to configure and get started.
Emergency communications are also almost exclusively analog so if you are looking for something for your bug-out bag, or in case you get lost on a hike miles from any civilization, analog may be a better choice.
DMR can work directly between two radios as well, but many of its coolest features come from internet connectivity:
“DMR radios are able to communicate with each other directly without a centralized system, but this is not always an ideal situation. Signals between radios connecting directly to each other can be hampered by obstructions in the line-of-sight between them such as trees, buildings, and hills”.
While radio to radio DMR is indeed possible and fairly common with business users, it is very rare with ham radio entheusiasts. Probably 95% or more of the ham radio users I have met that use DMR use it with hotspots and the internet.
What makes DMR really shine is how internet-linked repeaters and hotspots create worldwide networks. I can sit in my living room with a handheld DMR radio and a small hotspot and talk to someone in Australia. Try doing that with a simple analog HT!
“The low-cost and increasing availability of internet-linked systems has led to a rise in DMR use on the amateur radio bands”.
One last thing worth mentioning – DMR radios typically get up to 40% longer battery life than their analog cousins. For those of us who operate in the field, that’s a huge advantage.
Popular DMR Radios for Beginners
 Picking your first DMR radio can feel overwhelming with so many options out there. I’ve tried quite a few models over the years, and there are definitely some standouts that make the learning curve less steep for beginners. Let me walk you through the ones I think give you the most bang for your buck in 2025.
AnyTone 878UVII and BTECH DMR-6X2
The AnyTone AT-D878UVII Plus has become my go-to recommendation for folks just getting into DMR. This dual-band handheld can reach repeaters over 30 miles away without needing a hotspot. I really appreciate the battery life on these, and the USB-C rechargeable batteries make keeping it powered up super convenient.
If you want something similar but with a few extra bells and whistles, the BTECH DMR-6X2 uses the same platform as the D878UVII+ but adds some nice enhancements. The DMR-6X2 PRO gives you:
- True Tier II DMR capability
- Cross-band digital simplex repeater function
- Built-in voice recorder
- Support for storing up to 500K DMR user information
Both radios have Bluetooth, which is great if you want to use a wireless headset or remote PTT button. This has been a lifesaver for me when operating mobile or when I need my hands free.
TYT MD-380 and MD-9600 Overview
If you’re watching your budget, the TYT MD-380 is probably the most affordable way to get started with DMR. You can find these single-band radios (either VHF or UHF) pretty cheap, and they use a superheterodyne receiver that gives better sensitivity than some other budget options. There are even books specifically for this DMR radios such as Using DMR with the TYT MD-380/390 & MMDVM.

For those looking to put a radio in their vehicle, the TYT MD-9600 is a solid dual-band mobile option with good power output (45-50W). It offers:
- Storage for 10,000 contacts and 3,000 channels
- Four power settings to choose from
- IP54 compliant microphone
- Upgradable firmware
I like the MD-9600’s audio – it’s clean and loud through that 5W receive audio amp, which makes a big difference when you’re in a noisy car. The cooling system with heat sink and fan also keeps it from overheating during long transmissions, which I’ve found to be an issue with some other mobile rigs.
Radioddity GD-88 and GD-77 Comparison
The Radioddity GD-88 is a big step up from their earlier GD-77. I was impressed when I first tried one – it has two separate VFOs so you can operate on VHF and UHF at the same time, plus you can select either 7W or 2.5W output power.
What really sets the GD-88 apart are some advanced features you usually only find in pricier radios:
- Cross-band repeater function between analog and digital
- Same Frequency Repeater capability
- GPS with APRS functionality
- Room for up to 300,000 DMR contacts
The battery life is pretty remarkable too – a 3000mAh battery that gives you up to 23 hours in digital mode. I appreciate that the desktop charger can hold both the radio and a spare battery.
Baofeng DMR Options
You knew Baofeng would be on this list, right? Their DMR lineup gives you the most bang for your buck if you’re really trying to keep costs down. The DM-1701 is dual band (VHF/UHF) and stores 3,000 channels, 10,000 talk groups, and 120,000 contacts.
The 2200mAh battery in the DM-1701 gives you about 18 hours of use and 48 hours on standby – roughly 30% longer than similar DMR radios in this price range. You also get:
- True 2-time slot DMR operation
- Color TFT display (1.77″)
- SMS, emergency alarm, and encryption features
- FCC Part 90 certification
Baofeng’s newer DM-32 adds GPS/APRS and some simulation features the earlier models didn’t have. I haven’t used this one as much, but the specs look promising.
Retevis RT3S and Radtel RT-4D
The Retevis RT3S is compact with dual band capability and GPS built in. It supports up to 3,000 channels and works with MOTO TRBO Tier I and II standards. The 2000mAh battery gives you about 16 hours of operation, which is decent for its size. It is extremely affordable and there are even books specific to this radio for DMR such as Using DMR With the Retevis RT3s & MMDVM.

The Radtel RT-4D is interesting because it offers:
- Expanded frequency coverage including aviation band reception (108-136 MHz)
- 1024 channels across 250 zones
- Support for 2,000 digital contacts
- Advanced encryption methods (ARC/AES-128/AES-256)
You can also customize things like startup logos, voice announcements, and function keys on the RT-4D.
When choosing your first DMR radio, don’t just look at features and price. Consider how easy it is to update the firmware, the quality of the programming software, and how much community support exists. Most radios I’ve mentioned here have upgradable firmware and decent programming software, which should keep them useful as DMR technology evolves.
Understanding Hotspots: What They Are and How They Work
When I first got into DMR, I quickly ran into a problem – there weren’t any repeaters in my area. That’s when I discovered hotspots, and they completely changed my DMR experience.
A DMR hotspot is basically your personal gateway to connect your digital radio to worldwide networks. Think of it as a mini-repeater that sits on your desk or goes in your pocket. Instead of needing a big repeater tower somewhere, your little hotspot connects to the internet and bridges your radio to DMR networks around the world.
Hotspots typically cover a few hundred feet to maybe a mile depending on where you put them and what antenna you’re using. Unlike the big repeaters that need serious infrastructure and licensing, these little boxes run at low power and connect through your home internet or even your phone’s hotspot.
Simplex vs Duplex Hotspots
There are two main types of hotspots, and the difference matters:
Simplex hotspots use just one frequency for both transmitting and receiving. This means they can’t do both at the same time, which limits them to one time slot at a time. They’re usually cheaper, which makes them great for beginners just getting started. I started with a simplex hotspot and it served me well for quite a while.
Duplex hotspots, on the other hand, use separate frequencies for transmit and receive, letting you access both DMR time slots at the same time. This is super handy if you want to monitor one talk group while talking on another. As one ham told me, “I tend to use one timeslot for monitoring channels and the other for talking. That way if one slot is busy I can still get out using the other”.
Which one should you get? It depends on your budget and how you plan to use it. Most hotspots on Amazon cost between $120-$200, with the duplex models usually at the higher end.
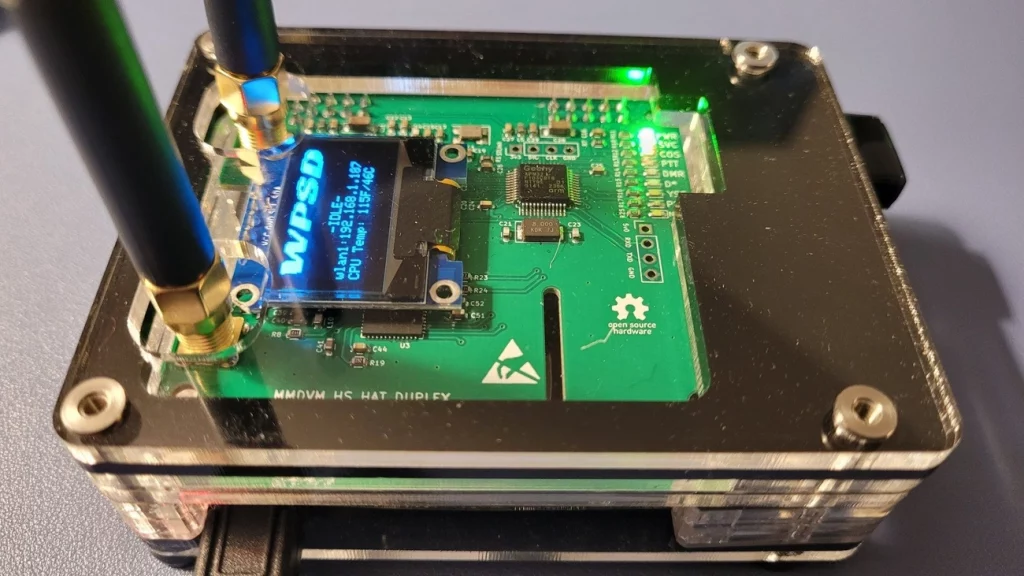
Pi-Star: Software and Hardware Options
When shopping for hotspots, you’ll run into two main platforms:
Pi-Star is an open-source software that runs on Raspberry Pi computers. It handles “complex services and configuration for Digital Voice on Amateur radio in a way that makes it easily accessible to anyone just starting out”. To build a Pi-Star hotspot, you’ll need:
- A Raspberry Pi (I recommend the Pi Zero 2 W if you want something very inexpensive, or a Raspberry Pi 3B+ if you want the best experience)
- An MMDVM HAT board
- An industrial microSD card (it will last longer running continously) loaded with Pi-Star software
- A good quality power supply and some kind of case
You can also purchase a completely assembled MMDVM for a little more money to make things easier.
Using a Hotspot with a Mobile Phone or Wi-Fi Dongle
One of the coolest things about hotspots is using them on the go. You’ve got a few options:
Your smartphone makes a great internet connection for your hotspot. “For less than USD 100.00, you can get a MMDVM hotspot device, and use your cell phone as the bridge to the internet”. This setup lets me operate from pretty much anywhere I’ve got cell service – parks, camping trips, you name it.
If you don’t want to drain your phone battery, dedicated USB Wi-Fi dongles work great too. “Pi-star out of the box supports this USB dongle, in fact it shows up as an ethernet device so it just works”. I’ve found phone pairing can sometimes be frustrating – it can be “somewhat time consuming” and often requires “repeating the process a few times”.
For home setup, nothing beats a direct ethernet connection: “If you operate your DMR Hotspot at home and you can connect via ethernet YOU SHOULD”. I noticed an immediate improvement in audio quality when I switched from Wi-Fi to ethernet for my home hotspot setup.
Codeplug Programming: The Core of DMR Radio Setup
If there’s one thing that separates DMR from the analog radio world, it’s the codeplug. I remember the first time I tried to program a DMR radio – I spent an entire weekend figuring out what seemed like an endless maze of settings. Let me walk you through what I’ve learned since then.
What is a Codeplug and Why It’s Important
A codeplug is basically a configuration file that tells your DMR radio everything it needs to know to operate. Think of it as the brain of your radio. While analog radios might just need a frequency and maybe a PL tone, DMR radios need a whole lot more information packed into these files:
- Contacts: All your talk groups, reflectors, and individual DMR IDs
- Channels: The frequencies, color codes, time slots, and which contacts to use
- Zones: Groups of channels that make sense together so you’re not scrolling forever
Without a properly configured codeplug, your fancy DMR radio is just an expensive paperweight. I’ve seen hams spend $500 on a radio only to get frustrated because they couldn’t program it correctly. As one expert puts it, “To the uneducated eye this may look confusing and complicated,” but once you understand the basics, it gets much easier.
Reading and Writing Codeplugs with CPS
Customer Programming Software (CPS) is what you’ll use to create and modify codeplugs. Each manufacturer has their own version, and they’re rarely what I’d call user-friendly. Remember Windows 95? Some of this software feels like it hasn’t been updated since then.
Before you do anything else, you need to set your unique DMR ID in the general settings. This ID is tied to your callsign and is how other stations identify you on the network. I still remember the first time I made a contact and the other operator greeted me by name before I said anything – that’s because their radio displayed my info based on my DMR ID.
Creating a codeplug typically follows this process:
- Add all your digital contacts with the appropriate talk group IDs
- Create channels linking frequencies with contacts and technical parameters
- Organize those channels into logical zones for easier navigation
Here’s a tip from my experience: don’t go crazy adding every possible talk group and channel at first. I made that mistake and ended up with a confusing mess. Start with a handful of channels you’ll actually use, and build from there.
For beginners, I highly recommend finding a pre-built codeplug for your radio model and local area. This can save you “many hours of tedious programming.” You can always customize it later as you learn more.
Matching Firmware and CPS Versions
This is where things get tricky, and it’s something the sales brochures never mention. Your CPS version must match your radio’s firmware version. Period. If they don’t match, you’ll typically get frustrating error messages like “Model settings does not match.”
I learned this the hard way when I updated my radio’s firmware but used the old CPS software. Nothing worked, and it took me hours to figure out why. The relationship between firmware and CPS is tightly coupled because these programs make specific assumptions about memory layout in the radio.
When updating your radio, follow these steps:
- Read the existing codeplug with your current CPS version
- Export important settings to save them
- Update the firmware following the manufacturer’s instructions
- Install and use the matching CPS version
- Rebuild and upload your codeplug
This technical process is definitely the steepest part of the DMR learning curve. The good news is that there are tons of helpful videos and forum posts that can guide you through the process for your specific radio model.
Simple? Not exactly. Worthwhile? Absolutely. Once you’ve got a working codeplug, the world of digital communication opens up in ways you never imagined with analog radio.
Step-by-Step: Creating a Codeplug from Scratch

Image Source: Jeffrey Kopcak, MBA – K8JTK
I remember my first attempt at creating a codeplug from scratch – talk about a headache! But after helping dozens of fellow hams get their DMR radios up and running, I’ve developed a straightforward process that works every time. Let me walk you through it.
Setting Radio ID and General Settings
First things first – you need your personal DMR ID. If you don’t have one yet, head over to RadioID.net to get your unique seven-digit identifier. This is like your digital callsign in the DMR world.
Once you’ve got your ID, open up your radio’s CPS software (every manufacturer has their own version). Look for the General Settings section – it’s usually right at the top. Enter your DMR ID in the designated field. This is absolutely critical – without it, nobody will know who’s transmitting.
While you’re in the general settings, I usually set my squelch level to about 3, give my radio a name for the power-on display (mine says “KB8XXX DMR”), and set a reasonable timeout timer. I prefer a 180-second timeout – long enough for me to finish a thought, but not so long I’d tie up a repeater if something went wrong.
Creating Digital Contacts and RX Groups
Now comes the foundation of your codeplug – your digital contacts. Think of these as your phone’s contact list, but for radio. For each talk group you want to use, you’ll need to create a contact with:
- A descriptive name (like “World Wide” or “North America”)
- Call type set to “Group Call” (most common for talk groups)
- The numerical ID for that talk group
After loading up your contacts, you’ll need RX Groups. This confused me terribly when I first started with DMR. Basically, an RX Group is a collection of talk groups you want to hear on a particular channel. At minimum, include the talk group you plan to transmit on, but you can add others you want to monitor as well.
I found creating separate RX Groups for different purposes helps keep things organized. I have one for local stuff, one for regional, and one for my favorite international talk groups.
Channel Configuration: Time Slot, Color Code, Talkgroup
Now for the meat and potatoes – channel configuration. This is where you connect all the pieces together. For each channel you create, you’ll need to set:
- A name that makes sense to you (I use location + talk group like “Main St-Local”)
- The receive and transmit frequencies for your local repeater
- Color code (usually 1, but check with your repeater operator)
- Time slot assignment (1 or 2, depending on what the repeater uses for that talk group)
- The TX contact (which talk group you’re transmitting to)
- RX group list (which lets you hear other talk groups on this channel)
Getting the time slot right is super important. On my local repeater, all local talk groups are on TS1, while all the wider-area stuff is on TS2. Using the wrong time slot means nobody will hear you!
Zone and Scan List Setup
Once you’ve got your channels defined, organize them into zones. Think of zones like folders on your computer – they help you group related channels. Most radios show 16 channels per zone, so I organize mine geographically.
For example, I have zones for:
- Downtown repeaters
- Suburban repeaters
- Travel (with channels I use when visiting other cities)
Scan lists are optional but incredibly useful. They let you monitor multiple channels without having to manually switch between them. I typically create scan lists with no more than 8-10 channels – any more and you miss too much as the radio cycles through them.
To set up a scan list:
- Give it a descriptive name
- Add the channels you want to monitor
- Set priority channels if needed (I make my local emergency channel priority)
- Assign the scan list to the appropriate channels
Saving and Writing to the Radio
Don’t skip this step! Once you’ve gone through all that work, save your codeplug to your computer with a descriptive filename. I use “RadioModel_MyCall_Date” format so I can keep track of different versions.
Before writing to your radio, make sure it’s powered on and properly connected with the programming cable. I’ve learned the hard way that some radios need to be turned on before connecting the cable, while others work better if you connect first, then power on.
Click “Write to Radio” and let the magic happen. This might take anywhere from 30 seconds to several minutes depending on your radio.
One last tip – whenever you want to make changes in the future, always read from the radio first. This ensures you’re working with what’s actually in the radio, including any changes you might have made directly on the device.
Hotspot Configuration for Your DMR Radio

Image Source: YouTube
Now that you’ve got your codeplug set up, it’s time to configure your hotspot. This is where things get really interesting – your little personal gateway to the world. I’ve spent countless hours tweaking my hotspot settings, and I’ve found there are a few key areas that make the biggest difference in how well your setup works.
Assigning Static and Dynamic Talkgroups
When using a hotspot, you’ve got two ways to handle talkgroups – static and dynamic:
Static talkgroups stay permanently active on your hotspot. Think of them as always-on channels that will pass traffic whether you’ve recently used them or not. Setting these up takes a few steps:
- Create an account on BrandMeister using your DMR ID
- Generate an API key (look under “Security Settings”)
- In Pi-Star, go to Expert settings and paste in your API key
- Now you can add static talkgroups through the BrandMeister self-care portal
Dynamic talkgroups work differently – they activate temporarily when you transmit on that talkgroup’s channel. On BrandMeister, they typically stay active for about 15 minutes after your last transmission. If you want to clear all your dynamic talkgroups at once, just transmit the special code 4000. Pretty simple.
I really like the “auto-static” feature on simplex hotspots. It keeps your current talkgroup active until you transmit on a different one. This has saved me a lot of hassle when I’m having longer conversations.
Time Slot Mapping for Hotspot Use
Time slots work a bit differently depending on what type of hotspot you’re using:
- If you’ve got a simplex hotspot (the most common type), you’re typically stuck with only Time Slot 2 due to some technical limitations
- Duplex hotspots can use both Time Slot 1 and 2, which means you can monitor multiple talkgroups at once
The good news is that unlike with repeaters, you’ve got flexibility with personal hotspots. I’ve had people ask me, “Does it matter which timeslot I use on my hotspot?” The answer is pretty straightforward – not really. With your personal hotspot, you can assign talkgroups to either slot based on what works best for you.
Most hotspots use Color Code 1 by default. Think of this as DMR’s equivalent to the old CTCSS tones in analog radio.
Avoiding Interference with Satellite Bands
This part is really important. You absolutely must avoid transmitting in certain frequency ranges:
- 435-438 MHz (70cm satellite subband)
- 145.8-146.0 MHz (2m satellite subband)
Even though your hotspot puts out very little power, it can still cause interference with satellite operations. I’ve heard from the AMSAT Vice President-Operations that DMR signals have interfered with AO-92 satellite uplinks on 435.35 MHz.
The FCC is pretty clear about this too – regulations §97.201(b) specifically prohibit auxiliary stations (which includes hotspots) from operating in these segments. Always double-check your frequency settings before turning on your hotspot. I learned this the hard way when I accidentally set up on a protected frequency and had to reconfigure everything.
Most Popular Talkgroups to Get Started With
Think of talkgroups as the meeting places in DMR networks – they’re similar to channels but way more flexible. Once you’ve got your radio and hotspot up and running, you’ll need to know where the action is. Let me walk you through the talkgroups I’ve found most useful when getting started with DMR.
TG 91: Worldwide
Talkgroup 91 is where all the global action happens on BrandMeister. I spent hours listening here when I first got into DMR. It’s amazing to chat with operators from Australia one minute and Germany the next! Since it’s so popular, I’ve learned to keep a few basic rules in mind: keep conversations reasonably short, leave gaps between transmissions so others can jump in, and always listen before transmitting.
If you’re free on Saturdays at 16:00 UTC, check out the World Wide Check-In on TG 91. It’s a great way to get a feel for just how global the DMR community really is.
TG 3100: USA Nationwide
For those of us in the States, TG 3100 is home base. I use this as my primary calling channel when I’m looking to make domestic contacts. It connects with several CBridge systems too, which extends its reach.
One thing to remember – while international stations are welcome to participate, if you’re not a USA station having an extended chat with another non-USA station, it’s polite to move to another talkgroup. Think of it like not hogging the main phone line when others need to make calls.
TG 505: Australia Wide
I’ve had some great conversations on TG 505, which serves as Australia’s nationwide calling channel. You’ll typically find it on time slot 2. What’s cool about this talkgroup is that it opens every repeater and hotspot across the country (assuming they’re programmed properly).
The Aussies have good etiquette – after making contact on 505, they usually move to another talkgroup, often on time slot 1, to keep the main channel open for new calls. Smart system!
TG 3805: VK5 Statewide
For more regional chats in South Australia, TG 3805 operates on time slot 1. I like how this arrangement works – you can chat locally while the national talkgroups operate on different time slots. It’s less overwhelming than the nationwide groups and perfect for when you want a more manageable conversation circle.
TG 9: Local Repeater Use
TG 9 is different from all the others – it’s strictly local. When you transmit here, your signal stays on your local repeater and never goes out to the broader network. This makes it perfect for testing or local conversations where you don’t need to tie up network resources. I use it all the time for quick local checks. You’ll usually find TG 9 on time slot 2.
TG 9990: Parrot Echo Test
The Parrot (TG 9990) has saved me from embarrassment more times than I can count! This simple but essential talkgroup records and plays back your audio. It’s the first place I go when setting up a new radio or hotspot.
To use it, just set up a private call to 9990, transmit your message, and wait a moment – you’ll hear your own audio played back to you. This lets you check your radio setup, repeater connection, internet connectivity, and audio quality all in one go. Super handy!
!Hero Image for DMR (Digital Mobile Radio): The Beginner’s Guide You Actually Need in 2025
You can get into digital mobile radio for as little as $12 these days, and talk to people around the world without needing fancy equipment or big outdoor antennas. That’s pretty amazing when you think about it. The European Telecommunications Standards Institute created DMR back in 2005, and it’s completely changed what’s possible with ham radio.
I’ve found DMR offers some real advantages over the analog radios I’ve used for years. The two-slot TDMA technology lets two conversations happen at the same time on one 12.5 kHz channel – something impossible with analog. My batteries also last about 40% longer with DMR radios, which is a huge plus when I’m operating away from power sources.
The growth of DMR has been incredible. Last time I checked, there were approximately 5,500 repeaters and 16,000 hotspots connected worldwide, and that number from 2016 has surely grown since then. DMR comes in three flavors – Tier I (no license needed), Tier II (licensed conventional systems), and Tier III (trunked operation). Most hams I know use Tier II. The best part? Even if you only have a Technician class license, you can use DMR.
Getting started isn’t quite as simple as turning on an analog radio, though. You’ll need to wrap your head around some new concepts like DMR IDs, talk groups, and code plugs. Those code plugs (the configuration files for your radio) can take hours to set up right the first time. Trust me, I’ve been there.
This guide will walk you through everything you need to get on the air with DMR in 2025. I’ll cover choosing equipment, programming your radio, and connecting to the most popular talk groups worldwide. Let’s jump in.
FAQs
Q1. What are the key advantages of DMR over analog radio? DMR offers clearer audio quality, doubles channel capacity through TDMA technology, and extends battery life by about 40% compared to analog systems. It also provides enhanced features like text messaging and GPS tracking.
Q2. How do I get started with DMR as a beginner? Start by obtaining a DMR ID, selecting a compatible radio, and learning to program codeplugs. Familiarize yourself with concepts like talkgroups and time slots. Consider using a hotspot for easier access to worldwide networks.
Q3. What’s the difference between simplex and duplex hotspots? Simplex hotspots use a single frequency for transmitting and receiving, limiting them to one time slot. Duplex hotspots use separate frequencies, allowing access to both DMR time slots simultaneously for more flexibility.
Q4. Which talkgroups are recommended for new DMR users? Popular starting points include TG 91 for worldwide connections, country-specific talkgroups like TG 3100 for the USA, and TG 9990 for testing your setup. Local and regional talkgroups are also good for getting familiar with the system.
Q5. Is DMR communication private? While DMR offers features like private calls between specific IDs, it’s not truly private on amateur radio frequencies where encryption is prohibited. For fully private DMR communications, a business license and assigned frequencies are required.
This is KB1OTQ Don:
This is fantastic overview of ham radio DMR. I would like use this outline along with a show and tell at our club meeting, POTA and Field Day events. I got involved with DMR acouple of years ago and use my Anytone equipment for both analog and DMR, but see the future of ham radio in digital (recruitment of younger hams). I am certainly invested in HF portable as well. I love the community of ham radio people at all levels. Thank you for this Great overview
You are more than welcome to use it. Although absolutely not required, I would very much appreciate it if you made mention where it came from. Enjoy!