
I can’t tell you how many times I’ve seen new hams struggle with poor reception, only to discover they’re using that stock “rubber duck” antenna that came with their radio because they have no idea what the different types of ham radio antennas are. Want to know a simple secret? Swapping that stubby little thing for a decent antenna like the Nagoya NA-771 or better yet, a Diamond SRJ77CA can make your radio perform like it’s an entirely different beast.
Choosing the right antenna has honestly made more difference in my radio operations than spending hundreds on fancy transceivers. I’ve tried pretty much all the antenna types I’m covering in this article, and each has its place depending on what you’re trying to do.
For those just getting started, the options can be pretty overwhelming. A basic wire dipole (which I actually recommend most beginners start with) can be built for around $60 if you buy all the parts. On the flip side, commercial vertical antennas typically start at $250 for decent quality. But price isn’t everything when picking the right antenna for your situation.
Size is another huge consideration. Take the popular G5RV antenna – it stretches about 102 feet across, which might work great if you’ve got a decent yard but is completely impractical for apartment dwellers. The End Fed Half Wave is even longer at around 135 feet for 80 meters. Meanwhile, I’ve gotten surprisingly good results from roll-up J-pole antennas that can fit in your pocket when not in use.
Whether you’re trying to set up in a tiny apartment or you’ve got acres of land to work with, I’ve broken down the 10 most common ham radio antennas with a focus on what works well without emptying your wallet. For each antenna type, I’ll share what bands they work on, how hard they are to build yourself, what they’ll cost you, and most importantly – what kind of performance you can actually expect.
End Fed Half Wave Antenna
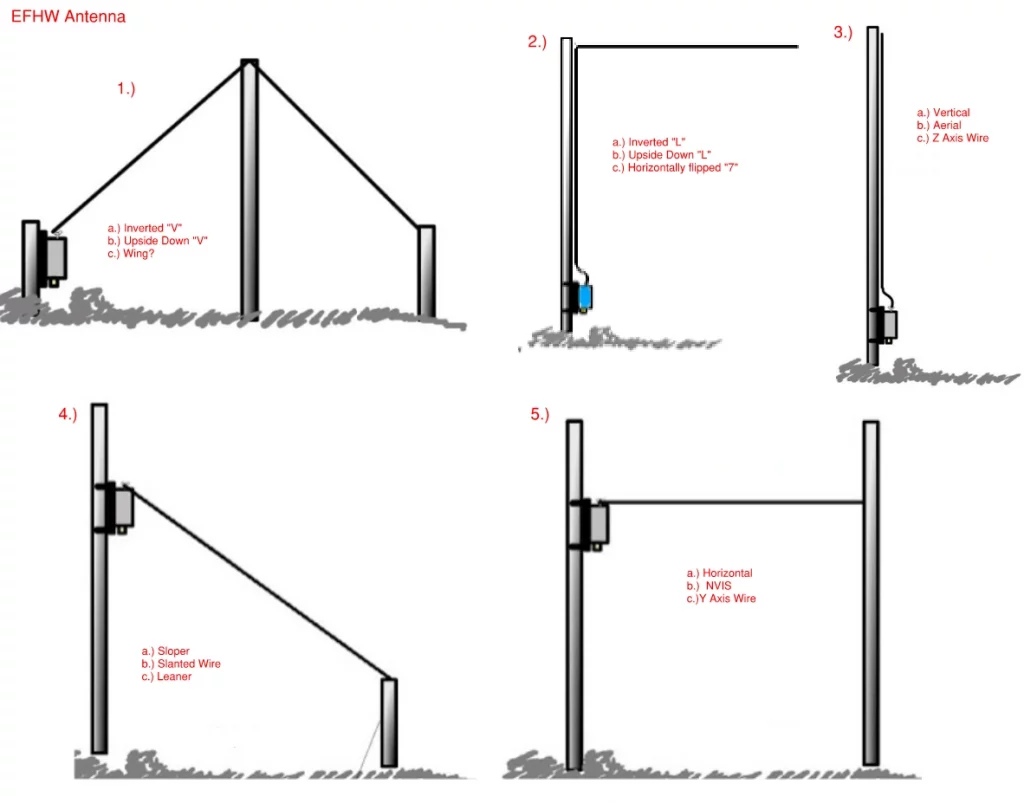
Image Source: Reddit
I’ve been using End Fed Half Wave (EFHW) antennas for years now, and they’re honestly one of the most versatile options out there. I recommend them to both beginners and experienced operators because they give you multiband capability without all the complexity of trap systems or needing tons of space.
End Fed Half Wave Antenna Description
An EFHW is pretty straightforward – it’s basically a single wire cut to exactly half the wavelength of the lowest band you want to operate on. For a 40-meter EFHW, that’s about 66-67 feet of wire. What makes these different from your standard dipole is how they connect to your radio. Instead of feeding it in the middle, you connect at one end using a special matching transformer – usually a 49:1 unun. This clever little device converts the antenna’s high impedance (somewhere between 2,500-5,000 ohms) down to the 50 ohms your transceiver wants to see.
The first EFHW I built included a small capacitor (around 100-150 pF) in the transformer to improve the high-frequency response. I’ve found this helps compensate for transformer leakage inductance. Sometimes you’ll need a short counterpoise wire, though I’ve seen plenty of setups where the coax shield itself acts as the counterpoise.
End Fed Half Wave Antenna Frequency Range
The thing I love most about my EFHW is that it naturally works on multiple bands. A wire I cut for 40 meters also works great on:
- 20 meters (as a full wave)
- 15 meters (as three half-wavelengths)
- 10 meters (as a double full wave)
This is a huge advantage over center-fed dipoles, which only work well on odd harmonics. The EFHW happily performs on both odd AND even harmonics. I’ve seen some commercial EFHW antennas that cover from 80 all the way to 10 meters with SWR readings of 1.2 or better across all those bands after proper tuning.
End Fed Half Wave Antenna Pros and Cons
Pros:I’ve found these antennas incredibly easy to set up – often taking me just minutes. You can configure them in all sorts of ways – horizontal, sloper, inverted V, or even an inverted L if you’re tight on space. The single-point connection means you only need one support instead of three for a traditional dipole. And getting multiband operation without any traps is a huge plus. I take mine on SOTA (Summits On The Air) activations because they’re so lightweight and portable. They’re also pretty cheap compared to some fancier antenna types.
Cons:I have to be honest – I’ve experienced some RF feedback issues with these. You’ll almost certainly need a common mode choke or decent counterpoise for best results. My first EFHW caused some interference with my computer monitor and other electronics in the shack. They also tend to pick up more noise than some other antenna types I’ve used. And be prepared for your SWR to shift around a bit when it rains or the temperature changes drastically.
End Fed Half Wave Antenna Build Difficulty
I’d rate these about 2 out of 5 on the difficulty scale for building. The trickiest part is making the impedance matching transformer, which involves winding wire around a ferrite toroid. You’ll need basic soldering skills and the ability to drill a few holes in a project box to house the transformer. Nothing too complicated, but not quite as simple as a basic dipole.
End Fed Half Wave Antenna Cost (Build vs Buy)

DIY Option: When I built mine, it cost me about $40-60 for all the parts – wire, project box, ferrite toroid core, connectors, and mounting hardware. The ferrite toroid was the priciest part of the build.
Commercial Options: If you’d rather buy one ready-made, they start around $40 for basic QRP models and go up to around $180 for the heavy-duty versions rated at 1,500 watts. A nice middle ground would be the JYR8010 150W model.
End Fed Half Wave Antenna Best Use Case
I’ve found my EFHW really shines in certain situations. It’s perfect for:
- Portable operations – I use mine all the time for POTA and SOTA activations
- Limited space installations – the flexible configuration options saved me when I lived in a small lot
- Emergency communications when you need quick deployment
- Beginners looking for their first effective HF antenna
- Field Day and other temporary setups where ease of installation matters
The radiation pattern is essentially the same as a dipole when you’re using it on its fundamental frequency, but it changes as you move up in frequency. When I use mine on 20 meters (the second harmonic of my 40m antenna), I notice the lobes form at different angles than on 40m.
Wire Dipole Antenna
Image Source: Palomar Engineers
If you ask ten different hams what the best “first antenna” is, at least eight of them will probably tell you it’s the wire dipole. There’s a good reason for this – I’ve built numerous dipoles over the years, and they continue to be my reference standard for comparing other antennas. When someone asks me “how does antenna X perform?” I almost always answer in terms of how it compares to a dipole at the same height.
Wire Dipole Antenna Description
At its heart, a wire dipole couldn’t be simpler – it’s just two equal-length wires connected to your feedline in the middle. The math for figuring out how long to make it is pretty straightforward too: 468 divided by your frequency in MHz gives you the total length in feet. So for a 20-meter dipole at 14.200 MHz, you’d end up with about 33 feet total length, with each leg being around 16.5 feet.
One thing I really like about dipoles is their flexibility in how you hang them. You can string them up completely horizontal (flattop), hang them with the middle high and the ends lower (inverted V), or even slope them with one end higher than the other. The inverted V is particularly handy since you only need one tall support in the middle – perfect if you’ve just got one decent tree to work with.
Wire Dipole Antenna Frequency Range
I’ve built dipoles for pretty much every band from 80 meters up to 10 meters. While most people build single-band dipoles at first, you can easily make them work on multiple bands by creating what’s called a “fan dipole” – essentially multiple dipoles sharing the same feedpoint.
The bandwidth of your dipole (how much of the band it covers with low SWR) depends somewhat on the thickness of the wire. I’ve found that using thicker wire definitely helps if you want to cover more of a band without retuning.
Wire Dipole Antenna Pros and Cons
Pros:
- Dead simple to build – honestly, if you can cut wire and tie knots, you can build a dipole
- Really efficient when cut to the right length
- Radiates well in all directions perpendicular to the wire – great for general use
- The impedance at the center (around 72 ohms) is close enough to 50-ohm coax that you don’t absolutely need a tuner
- Easy to tweak by trimming the ends if your SWR isn’t perfect
Cons:
- You need enough space to fit the whole thing – half wavelength can be pretty long on lower bands
- How high you hang it and what’s around it makes a big difference in performance
- Single-band dipoles won’t let you change bands without a really good tuner
- No gain in any particular direction like you’d get with a beam antenna
Wire Dipole Antenna Build Difficulty
On a scale of 1-5, dipoles are definitely a 1. This is absolutely the easiest antenna to build. All you really need is:
- Some wire (I usually use 14 AWG, but 12-16 gauge works fine)
- A center insulator to connect your coax
- End insulators (even dog bone insulators from the hardware store work great)
- Some coax and the right connector for your radio
- Basic tools to measure and cut the wire
If you can strip wire and make electrical connections, you’ve got all the skills needed. This is why I always recommend dipoles as first antenna projects.
Wire Dipole Antenna Cost (Build vs Buy)

DIY Option: I’ve built plenty of dipoles for around $25-40 total. That gets you the wire, insulators, and even a simple 1:1 balun if you shop carefully.
Commercial Options: Ready-made dipoles start around $60 for basic single-banders and go up to $250+ for fancy multi-band versions. The Gipsy 5-50MHz dipole is an excellent middle ground antenna that would serve you very well.
Wire Dipole Antenna Best Use Case
In my experience, dipoles really shine for:
- Home stations where you’ve got enough space to put one up
- Field Day setups where you need something reliable and quick to deploy
- New hams who need a first antenna that just works without fuss
- Operators focused mostly on local and regional contacts
If you’ve only got one support point (like a single tall tree), the inverted V configuration works surprisingly well and gives you a bit more omnidirectional coverage than a perfectly horizontal dipole.
Vertical Antenna
Image Source: The DXZone
If you’re dealing with limited horizontal space but still want to make solid contacts, vertical antennas might be your answer. I’ve used these skyward-pointing radiators for years when operating from locations where stringing up a wire dipole just wasn’t practical.
Vertical Antenna Description
A vertical antenna is pretty much what it sounds like – a single radiating element that sticks straight up from the ground with a system of radials serving as the ground plane. The quarter-wave vertical is what you’ll typically see, measuring about 234/frequency(MHz) feet in length.
Here’s something many new hams miss: most verticals absolutely need radials – those are conductive wires extending outward from the base – to create an effective RF ground plane. I learned this the hard way with my first vertical. Without a decent radial system, performance drops dramatically, and you’ll wonder why everyone else seems to hear stations you can’t.
Vertical Antenna Frequency Range
One thing I love about verticals is that they work across all amateur bands. They’re especially practical for lower frequencies (80-40m) where full-sized horizontal antennas would require huge amounts of space. I’ve seen multiband verticals that cover 2-30MHz with proper design.
Some commercial models like the Diamond BB-7V cover 10m through 80m without requiring complex tuning adjustments. This makes them pretty versatile for operators with limited space who still want to work multiple bands.
Vertical Antenna Pros and Cons
Pros:
- Omnidirectional radiation pattern in the horizontal plane – no need to rotate anything
- Low angle of radiation that’s perfect for DX contacts
- Takes up minimal horizontal space (perfect for small lots)
- Much easier to install than full-sized horizontal antennas for lower bands
- Less dependent on ground conditions than wire antennas
Cons:
- Pick up more electrical noise than horizontal antennas (I notice this especially in urban areas)
- Need an extensive radial system for good performance (16-60 radials is ideal)
- Lower overall gain than directional antennas like Yagis
- Smaller models struggle with performance on lower frequency bands
- Not as good for local communications as horizontal antennas
- Quite expensive comparitively
Vertical Antenna Build Difficulty
I’d rate verticals about 3/5 on the difficulty scale. The antenna itself isn’t complicated, but creating an effective ground plane requires careful planning. If you’re building your first vertical, I’d recommend focusing on a quarter-wave design with at least 16 ground radials. That seems to be the sweet spot between performance and the amount of work involved.
Vertical Antenna Cost (Build vs Buy)
DIY Option: You can build a basic quarter-wave vertical for about $40-70, including wire, mounting hardware, and connectors. The most time-consuming part will be installing all those ground radials.
Commercial Options: Ready-made vertical antennas start around $95 for basic models and go up to $500+ for multiband versions with built-in matching networks. I’ve had good experiences with both the Comet Original CHA-250HD (around $470) and the DX Commander (about $499).
Vertical Antenna Best Use Case
In my experience, vertical antennas shine in these situations:
- DX operation where that low-angle radiation helps you reach distant stations
- Small lot installations where you simply don’t have room for horizontal wires
- Lower bands (80-40m) where full-sized horizontal antennas would be enormous
- HOA-restricted areas where you can disguise your vertical as a flagpole (I’ve done this!)
- Mobile or portable operations where you need an omnidirectional pattern
If you’re mainly interested in working distant stations and have limited space, a vertical might be your best option. Just don’t skimp on those radials!
Hamstick / Trapped Dipole Antenna
Image Source: Amazon.ca
I’ve played with Hamstick antennas quite a bit over the years, and they’re honestly one of the best compromises I’ve found for hams with space problems or those looking for mobile options. These compact little antennas won’t outperform a full-sized dipole – nothing does – but they’ll definitely get you on the air when nothing else will.
What Exactly is a Hamstick?
A Hamstick is basically a fiberglass stick with a loading coil built into it and a stainless steel whip on top that you can adjust for fine-tuning. The standard ones run about 8 feet total length, with the fiberglass part being around 44 inches. They’ve got a 3/8″ x 24 thread at the bottom that fits most standard mounts.
One of the coolest things I’ve done with Hamsticks is to use a pair of them to make a dipole. You just get a universal dipole mount (costs about $14), attach two identical Hamsticks, and you’ve got yourself a portable dipole that works surprisingly well. Trapped dipoles work on a similar principle but use tuned circuits (the “traps”) to effectively cut off portions of the wire at certain frequencies.
What Bands Do Hamsticks Cover?
Each Hamstick is designed for just one band, and you can find models covering everything from 6 meters through 80 meters. The bandwidth varies quite a bit depending on which band you’re using:
- On 10 meters, you get about 2.6 MHz of bandwidth (basically the whole band)
- 15 meter versions give you about 1.4 MHz
- 20 meter models provide roughly 500 kHz
- 40 meter ones only offer 60-170 kHz (depends on your setup)
- 75/80 meter versions are really narrow at just 20-60 kHz
The Good and Bad of Hamsticks
What I like about Hamsticks:
- They’re compact enough to throw in the trunk for portable ops
- They won’t break the bank
- Swapping bands is as simple as unscrewing one and putting on another
- Once you’ve got them tuned, they’re pretty much set-and-forget
- You can use them mobile or as dipoles with the right mount
What’s not so great:
- The bandwidth is really limited, especially on the lower bands
- They’re way less efficient than full-sized antennas (up to 18dB worse on 75m)
- You might need separate antennas to cover different parts of the lower bands
- Some can be frustrating to tune properly
- I’ve found the 40m version to be particularly tricky to get right
How Hard Are They to Build?
I’d rate them about 2/5 on the difficulty scale. Most hams just buy Hamsticks rather than trying to make them because the loading coil is pretty specialized. That said, if you want to try making a trapped dipole, it’s doable if you’re comfortable winding coils and cutting wire to precise measurements. You’ll definitely want an antenna analyzer to help with tuning.
What Do They Cost?
If you want to build a trapped dipole yourself, expect to spend about $40-60 for materials including PVC pipe, wire, connectors, and mounting hardware.
Commercial Hamsticks typically run $20-30 each, so if you want to cover, say, four bands, you’re looking at $80-120. Add another $14 for the dipole mount if you want to use them that way. A great kit is the Shark Antennas S-F5S 5-pack which covers 10, 15, 20, 40, and 75m and runs about $150.
When Hamsticks Make the Most Sense
In my experience, Hamsticks really shine in these situations:
- Mobile HF operation where full-sized antennas just aren’t going to work
- Portable field operations like POTA activations (Parks On The Air)
- If you’ve got HOA restrictions and need something less obvious
- When you need to change bands quickly
- Temporary setups where you can mount them as dipoles in attics or other limited spaces
I’ve made some surprising contacts with these little antennas. No, they don’t perform like a full-sized dipole or beam, but I’ve worked Europe from the eastern US with a mobile Hamstick on 20 meters, so they definitely do work. Sometimes “good enough to make contacts” is exactly what you need.
G5RV Antenna
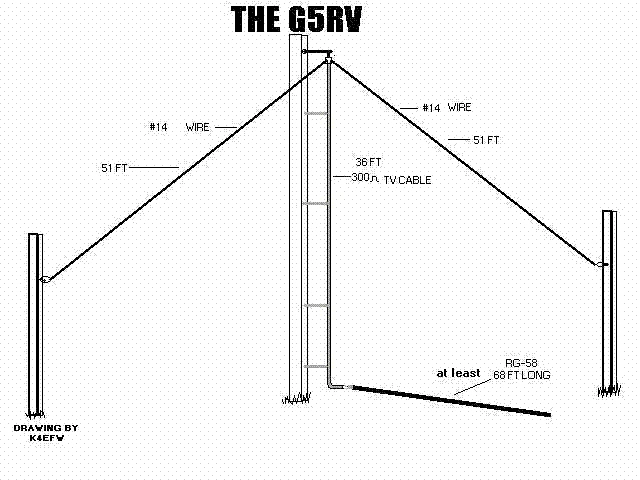
Image Source: Ham Universe
The G5RV antenna has been around since Louis Varney designed it back in 1946, and I’ve found it to be one of those antennas that hams either love or hate. I’ve used a few different versions over the years, and while it’s not perfect for every situation, it’s a pretty solid compromise for those of us who want multi-band capability without needing an acre of land. In fact, the G5RV Jr was the first HF antenna I ever set up and it made me a lot of contacts.
G5RV Antenna Description
Want to know what makes a G5RV unique? It’s essentially a 102-foot center-fed dipole connected to a special matching section of ladder line or twin-lead. This isn’t your standard dipole though – the matching section is what gives it its special properties. That matching section needs to be pretty specific: about 34 feet for open-wire feeder, 31.3 feet for ladder line, or 28.5 feet if you’re using old TV twin lead.
The interesting thing about the G5RV is that it was actually designed as a 3/2-wavelength antenna for 20 meters, with the matching section working as a 1:1 impedance transformer. A lot of folks don’t realize this and think it’s meant to be a perfect multi-band antenna, which leads to some disappointment.
G5RV Antenna Frequency Range
I’ve had decent results using my G5RV across 80 through 10 meters, though performance definitely varies by band. The sweet spot is around 14.150 MHz (20m), where it gives you a reasonably close impedance match of about 90 ohms.
The antenna performs differently across various bands. On 80/75m, it works as a folded dipole, while on 40m it functions as two half-waves in phase. On 20m (where it’s happiest), it’s a three half-wavelength antenna, and on 15m, you get two full-wavelengths fed in-phase.
G5RV Antenna Pros and Cons
Pros:
- You get multi-band coverage without needing traps or loading coils
- It’s significantly smaller than a full-sized 80m dipole (102 feet vs 130+ feet)
- They’re pretty cheap to build yourself
- I’ve noticed better low-angle radiation patterns on higher bands
- It works remarkably well and is an excellent choice for newcommers to HF
Cons:
- Despite what some folks claim, you’ll need an antenna tuner on pretty much all bands (maybe except 20m)
- SWR can get pretty wild on some bands (30m, 17m, and 10m are particularly rough)
- Feed line losses can eat your signal when SWR is high
- It’s not actually resonant on most bands, regardless of what you might hear
G5RV Antenna Build Difficulty
If you’ve got basic wire cutting skills and understand a bit about feed systems, a G5RV rates about 2 out of 5 on the difficulty scale. In my experience, the most important part is measuring the top section and matching line precisely.
If you’re building one for the first time, focus on getting that matching section right. It needs to hang vertically and stay away from metal objects. I made the mistake of letting mine drape over a metal gutter once, and it completely threw the tuning off.
G5RV Antenna Cost (Build vs Buy)
DIY Option: You can build your own G5RV for about $30-50, which includes wire, ladder line, and insulators. It’s one of the more economical antennas you can make.

Commercial Options: If building isn’t your thing, pre-made G5RV antennas run from $80 to about $195, depending on quality and whether they include extras like baluns. A good middleground version is the MFJ-1778 G5RV.
G5RV Antenna Best Use Case
I find the G5RV works best as a compromise antenna when you’ve got moderate space limitations but still want multi-band coverage. For best results, install it as a horizontal dipole at least 30-34 feet high.
If you can’t get it up that high horizontally, an inverted-V configuration works too, but try to keep the included angle over 120 degrees. For really tight spaces, there’s the G5RV Junior at 51 feet long that handles 40-10 meters. I’ve had one in my attic that worked surprisingly well for casual operating.
ZS6BKW Antenna
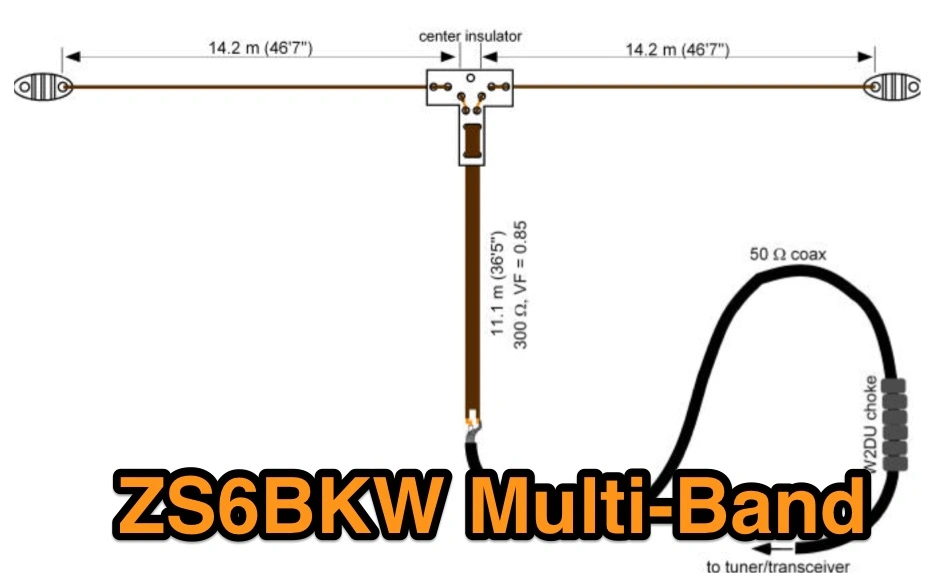
Image Source: The DXZone
I’ve always found the G5RV to be a decent multi-band antenna, but I’ve was fortunate in that my HF rig includes a nice auto-tuner which some people don’t have. That’s where the ZS6BKW comes in. This antenna is basically what happens when someone takes a G5RV and actually optimizes it with computer modeling instead of just guessing.
Brian Austin (ZS6BKW) developed this antenna back in the 80s, and I think it’s one of the most underrated antennas in ham radio. I switched to one about three years ago when my G5RV jr was ripped apart in a storm, and honestly wish I’d done it sooner.
What Makes the ZS6BKW Different?
Unlike the original G5RV that needs a tuner on literally every band, the ZS6BKW actually works on five bands with an SWR under 1.5:1 without a tuner. The secret is in the specific dimensions – it uses about 92 feet of wire with 36.5 feet of 300-ohm ladder line (or 12.2 meters of 450-ohm line if you prefer).
L.B. Cebik, who knew more about antennas than most of us ever will, said: “Of all the G5RV antenna system cousins, the ZS6BKW antenna system has come closest to achieving the goal that is part of the G5RV mythology.”
In plain English, this means it actually works as advertised, which is pretty rare in the antenna world!
What Bands Does It Cover?
The ZS6BKW works great on 10, 12, 17, 20, and 40 meters without needing a tuner at all. With a decent tuner, you can also use it on 6, 15, 30, and 80 meters.
I’ve had great results on 20 and 40 – far better than my old G5RV ever managed. Some folks I know have added a doorknob capacitor to help tune it on 75/80m, which is something I might try next time I have mine down for maintenance. It seems a good place to start with one of these is a 1000pF or 1nF and 5kV Doorknob capacitor and work up from there if needed.
Pros and Cons of the ZS6BKW
The good stuff first:
- Works on five bands without a tuner (this alone sold me)
- Performs way better than a G5RV, especially on 20/40m
- Seems less finicky about being near trees and other structures
- Works well as either a flat-top or inverted-V
- DX performance is impressive – I’ve worked Japan from the East Coast on 40W with mine
But it’s not perfect:
- The ladder line SWR goes crazy when it gets wet from rain or heavy dew
- You really need to get it up at least 40 feet high for it to work properly
- Requires at least 70 feet of coax to complete the matching network
- Still needs a tuner for 80, 15, 30, and 6m bands
How Hard Is It to Build?
On a scale of 1-5, I’d give this a 2/5 difficulty. It’s not quite as simple as a dipole, but it’s not rocket science either. The most critical part is getting the measurements right – this is definitely an antenna where precision matters.
If you’re building one yourself, pay close attention to the velocity factor of whatever ladder line you’re using. That’s where most folks mess up. Measure twice, cut once applies here more than ever.
What Will It Cost You?
If you build it yourself, expect to spend about $40-60 for wire, ladder line, and connectors. Not bad at all for a multi-band antenna.
If you’d rather buy one ready-made, you’ll spend between $100-150, with some of the fancier versions running up to $180. Still a bargain compared to many commercial antennas. I bought mine as the ARS-10098 G5RV Pro ZS6BKW optimized with 1:1 Balun from Amateur Radio Supplies.
When Should You Use a ZS6BKW?
This antenna really shines if you:
- Have moderate space (but not enough for full 80m dipoles)
- Want multi-band operation without constantly fiddling with a tuner
- Can get it up at least 40 feet high
- Are interested in DX work
I’ve had mine up for about three years now, stretched across the back yard in some trees about 40′ up, and it’s been fantastic on 20m. JA stations are like fish in a barrel on FT8 with just 40W. For the price and the performance, it’s hard to beat if you have the space to put it up.
Yagi-Uda Antenna

Image Source: Hamradio.my
When you absolutely, positively need to focus your signal in one direction, nothing beats a Yagi-Uda antenna. I’ve used these beam antennas for years when I need to hit distant repeaters or work satellites, and they’re absolute game-changers compared to omnidirectional options.
Yagi Antenna Description
A Yagi is basically a directional antenna system that looks a bit like a fish skeleton – there’s a horizontal boom with various elements sticking out from it. What makes it work is the clever arrangement: one driven element (usually a dipole) connects to your radio, while a reflector sits behind it and one or more directors sit in front. Each piece has a specific job – the reflector (longest element) bounces signals forward, the driven element does the actual transmitting/receiving, and those directors (shortest elements) focus your beam where you point it. When everything’s properly aligned, you get constructive interference that pushes your signal in one direction – kind of like a laser pointer versus a light bulb.
Yagi Antenna Frequency Range
I’ve built and used Yagis for everything from 3 MHz all the way up to 3 GHz. The catch is that each antenna typically works in a narrow range – usually just 2-3% of its center frequency. This makes them perfect for focusing on specific bands. Most commercially available models target specific frequency segments like 900-930 MHz, 1250-1300 MHz, and 2400-2450 MHz. If you want multi-band operation, you’ll need special designs with traps that effectively shorten elements at higher frequencies – a bit more complex but definitely doable.
Yagi Antenna Pros and Cons
Pros:
- Impressive gain (typically 7-12 dBi) that can really extend your range
- Excellent directivity – perfect for targeting distant stations
- Great front-to-back ratio that helps reject interfering signals from behind
- Surprisingly lightweight for their performance
- Won’t break the bank to build or buy
Cons:
- Narrow bandwidth – not really a “swiss army knife” antenna
- Needs precise tuning to work effectively
- You’ll hit diminishing returns at about 20 dB gain without getting into complex arrays
- The bigger they get, the trickier they are to install and keep aligned
- More vulnerable to wind and weather than simpler antennas
Yagi Antenna Build Difficulty
I’d rate building a Yagi at about 3/5 on the difficulty scale. The toughest part is getting all the measurements precise – a quarter-inch off can really impact performance. For my first build, I spent hours carefully measuring and cutting aluminum elements and mounting everything correctly on the boom. Materials are straightforward: aluminum tubing for elements, a strong boom (I prefer non-conductive material), and proper mounting hardware.
Yagi Antenna Cost (Build vs Buy)
DIY Option: I’ve built basic 144/440 Yagis for around $30-60 depending on what materials I had on hand and what I needed to buy. The satisfaction of crafting your own directional antenna is pretty rewarding too.
Commercial Options: If building isn’t your thing, you can find ready-made Yagi antennas starting at just $8-10 for simple 2.4 GHz models, while larger, more robust configurations typically run $30-100. For serious HF work, expect to pay more, a lot more, and then there is the tower and rotator so you better have some money saved up.
Yagi Antenna Best Use Case
Yagis shine when you need focused communication power. I’ve used them most successfully for:
- Reaching that one distant repeater that nobody else can hit
- Establishing reliable point-to-point links over significant distance
- Working amateur satellites (where pointing precision is critical)
- Extending WiFi range in a specific direction
The directional nature makes them perfect when you need to concentrate your signal power rather than broadcasting to everyone around you. When I installed my first serious Yagi and pointed it northeast, I suddenly had solid contacts with stations I could barely hear before.
Ground Plane Antenna
I’ve always thought of ground plane antennas as the reliable workhorses of ham radio. They’re not flashy or complicated, but they just plain work. I’ve built several over the years, and they continue to impress me with how much performance you can get from such a simple design.
What Exactly Is a Ground Plane Antenna?
The basic idea couldn’t be simpler – you’ve got a vertical element (usually a quarter wavelength long) that does the actual radiating, and then several radials coming out from the base that simulate a ground surface. The neat thing about this design is that the ground plane acts like a mirror, creating the electrical equivalent of a half-wave antenna while only requiring you to build half of it.
In most of the ones I’ve built, I’ve used four radials extending from the base. Some designs work with as few as two, but I’ve found four to be the sweet spot between performance and complexity. One little trick I’ve learned is to angle those radials downward at about 45 degrees – this helps match the antenna’s impedance closer to 50-ohms, which means better performance with standard coax.
What Bands Can You Use It On?
I’ve used ground plane antennas on just about every band from HF through UHF. They’re incredibly versatile. For VHF and UHF, I typically use aluminum or copper tubing for the radials – it’s rigid enough to hold its shape. For HF versions, I’ll use wire radials since they’re much more practical given the longer wavelengths.
The omnidirectional pattern makes these antennas particularly handy for mobile and portable setups. I’ve even tossed one up in a tree during Field Day when our main antenna went down, and it saved our operation.
The Good and Bad
Like everything in ham radio, ground planes come with tradeoffs.
The good parts:
- They radiate equally in all horizontal directions, which is perfect when you don’t know where the other station might be
- Super easy to adjust for low SWR (just trim the radiator a bit at a time)
- They have surprisingly good bandwidth
- They work reliably in almost any environment
- They’re about as simple to build as antennas get
The downsides:
- You absolutely need those radials for decent performance
- They tend to pick up more noise than some other antenna types
- The natural impedance is around 36 ohms, which isn’t a perfect match for 50-ohm systems
- How well they work depends a lot on having a decent ground plane
- Sometimes you need to add chokes to keep RF from coming back down your coax
How Hard Is It to Build One?
If you’re looking for your first antenna building project, this is it. I’d rate it a 1 out of 5 in difficulty. You can literally build one with some wire, a chassis-mount connector from your junk box, and basic tools.
The only moderately tricky part is measuring the vertical element and radials correctly. I usually cut them about 20% longer than the calculated values so I can tune by trimming. The classic formula is 234/frequency in MHz to get your length in feet. So for a 2-meter antenna at 146 MHz, that’s about 19.2 inches for the vertical element and each radial.
What’s It Going to Cost You?
DIY Option: Building your own ground plane is dirt cheap – usually $25-40 for wire and connectors. If you’ve got a junk box of parts like I do, you might build one for practically nothing.
Commercial Options: If you’d rather buy than build, simple VHF/UHF models start at around $40, while fancier commercial-grade multi-band versions can run $250 or more. I’ve used the Tram 1477-B for 2m/70cm operation from my house and it works like a charm and cost me about $80.
When Should You Use a Ground Plane?
These antennas really shine when you need omnidirectional coverage without a lot of space or complexity. They perform best when mounted at least 25 feet above ground, but I’ve used them much lower with acceptable results.
I particularly like them for:
- Fixed base stations where you want to talk in any direction
- Mobile applications (the car roof acts as your ground plane)
- Portable setups where quick deployment matters
- Emergency communications where reliability trumps everything
One thing I’ve learned through experience – the larger and flatter your ground plane, the better your antenna will perform, especially in mobile setups. A full-sized car roof works much better than a small magnetic mount on a trunk lid.
Roll-Up J-Pole Antenna
I’ve become a huge fan of roll-up J-pole antennas over the years, especially when I’m operating away from home. These flexible wonders deliver seriously impressive performance while taking up virtually no space in your go-kit. I’ve got one permanently tucked in my radio bag because they’re just that useful.
What Exactly Is A Roll-Up J-Pole?
These nifty antennas are typically made from thin twin-lead line in what’s called a SlimJIM configuration. The beauty of this design is that when you’re done using it, you can literally roll or fold it up and stick it in your pocket. Some of the better ones use amazingly durable materials – I’ve seen some made with Nitinol (a nickel-titanium alloy) that you can bend and twist without breaking.
When you’re ready to use one, you just hang it vertically from whatever’s handy – a tree branch, curtain rod, or even a suction cup hook on a window. Most commercial versions come with velcro straps to keep them neatly rolled up and dedicated hanging loops at the top.
What Bands Do They Work On?
Most roll-up J-poles are designed for VHF/UHF operation, primarily covering the 2-meter (144 MHz) and 70-centimeter (440 MHz) bands. The size varies based on the frequency – dual-band versions are typically around 19 inches long when deployed, while single-band models for 220 MHz and 440 MHz are just 12 inches and 6 inches respectively.
In my experience, dual-band models usually perform better on their primary band (usually 2m) with somewhat compromised performance on 70cm. That’s physics for you – it’s hard to optimize for both without some trade-offs.
Pros and Cons From My Experience
The good stuff first:
- You’ll get about 3 dBi gain with a nice low takeoff angle
- They’re incredibly lightweight – literally fits in your shirt pocket when rolled up
- They absolutely smoke those rubber duck antennas that come with handhelds
- No need for radials since it’s a half-wave design
- They handle outdoor weather just fine
- Perfect for HOA-restricted areas since they’re virtually invisible when deployed
The not-so-good stuff:
- Nearby objects can affect performance significantly
- If you get a dual-band version, the UHF performance is often a compromise
- You might need adapters depending on your radio’s connector type
- Heavy rain or dew can throw off the SWR
How Hard Are They To Build?
I’d rate them about 3 out of 5 on the difficulty scale. Not super easy, but definitely doable if you’ve got basic soldering skills. The trickiest part is cutting the coax sheath without damaging the ground braid underneath. Tuning requires adjusting the wire bridge position at the bottom of the ladder line, and I highly recommend using an antenna analyzer to get the SWR right.
What About Cost?
DIY Option: If you build one yourself, expect to spend about $25-35 for materials, mainly specialized twin-lead and connectors.
Commercial Options: Ready-made roll-up J-poles go for $30-60 depending on band coverage and accessories. The fancy ones with MOLLE pouches or specialized connectors typically run $10-15 more.
When Should You Use A Roll-Up J-Pole?
These antennas really shine in specific situations:
- Emergency communications and go-kits (I keep one in my emergency pack)
- POTA/SOTA activations when you’re hiking and every ounce counts
- Hotel room operation during travel (hang it in front of a window)
- Providing communications at public events where setting up is a challenge
- Any situation where you need to be stealthy with your antenna
I’ve had some of my best portable contacts using a simple roll-up J-pole hung from a tree branch during a POTA activation. The performance-to-size ratio is honestly hard to beat for portable VHF/UHF operations.
Rubber Duck Antenna
![]()
![]()
We’ve all seen them – those stubby little antennas that come with practically every handheld radio ever made. The rubber duck antenna is probably the most recognizable antenna in ham radio. It’s also, unfortunately, about the most compromised antenna you can use, trading actual performance for convenience.
Rubber Duck Antenna Description
The rubber duck is basically a short monopole antenna with a wire coiled into a tight helix and wrapped in a rubber or plastic jacket for protection. I’ve taken a few apart over the years (usually after breaking them), and what you find inside is pretty simple – they work kind of like a base-loaded whip antenna but with the loading coil built right into the structure instead of sitting at the bottom. This clever design is why they can be so much shorter than a proper quarter-wave whip, typically only about 4-15% of a wavelength.
Rubber Duck Antenna Frequency Range
Most rubber ducks you’ll encounter operate between 150 MHz and 5 GHz. The ones that come with amateur radios are typically designed for:
- 2m/70cm bands (144/440 MHz)
- Some commercial versions cover 900 MHz for ISM applications
- You’ll even find them on 2.4 GHz equipment for WiFi and Bluetooth
Rubber Duck Antenna Pros and Cons
Pros:
- These little guys are incredibly tough – I’ve bent mine nearly in half with no damage
- They’re perfect for pocket-sized radios where bigger antennas would be impractical
- The radiation pattern is omnidirectional, so you don’t need to point them
- They can handle any weather conditions you throw at them
- They work perfectly well when distance is short and/or there are few obstructions
Cons:
- Let’s be honest – their performance is terrible compared to almost any other antenna
- They have a very narrow bandwidth due to their high Q factor
- The current distribution is pretty terrible, making them electrically unpredictable
- I’ve sometimes had to use reflectors just to get a usable signal in fringe areas
Rubber Duck Antenna Build Difficulty
With a difficulty of 1/5, you’d think these would be easy to build, but the truth is almost nobody makes their own. The specialized manufacturing needed for the helical coil and proper jacketing means it’s just not worth the effort. Just buy them – they’re cheap enough.
Rubber Duck Antenna Cost (Build vs Buy)
The generic rubber ducks typically run about $20-25, while name-brand versions from companies like Diamond or Comet will set you back around $35. If you want a high-performance model for a specific application, expect to pay $40-60. I’ve found little performance difference between the $25 and $35 models, to be honest. The absolute best I have found without getting stupid is the Diamond SRJ77CA for Baofeng style connectors or the Diamond SRH77CA for Yaesu style connectors. These provide a substantial increase in performance, have very good build quality, and won’t break the bank.
Rubber Duck Antenna Best Use Case
Rubber ducks shine in just one scenario: when portability matters more than performance. They’re perfect for:
- Walking around a hamfest with your HT clipped to your belt
- Emergency services where the radio needs to be compact and rugged
- When you’re in an HOA that restricts visible antennas
- Situations where you need to get on the air quickly without any setup
The bottom line is that rubber ducks are convenient, but if you’re serious about performance, the first thing you should do is replace it with literally any other antenna option I’ve covered in this article.
Comparison Table
Hey, I know we’ve covered a lot of different antennas here, and it can be pretty overwhelming to keep track of all the details. To make things easier, I’ve put together this comparison table based on my own experience and research. This is exactly the kind of resource I wish I’d had when I was starting out.
I’ve tried to break down the key factors that matter most when choosing an antenna. Looking at this table helped me make much better decisions for my own station, and I hope it’ll do the same for you.
| Antenna Type | Frequency Range | Build Difficulty (1-5) | DIY Cost | Commercial Cost | Key Advantages | Key Disadvantages | Best Use Case |
|---|---|---|---|---|---|---|---|
| End Fed Half Wave | 80-10m (multiband) | 2/5 | $40-60 | $40-180 | Easy installation, multiband operation, single-point connection | RF feedback issues, requires choke/counterpoise | Portable operations, limited space installations |
| Wire Dipole | 80-10m | 1/5 | $25-40 | $60-250 | Simple design, high efficiency, omnidirectional | Requires adequate space, single-band limitation | Fixed home stations, beginners’ first antenna |
| Vertical | 80-10m | 3/5 | $40-70 | $95-500+ | Low angle radiation, compact footprint | Requires extensive radial system, higher noise | DX operation, small lots, HOA restricted areas |
| Hamstick/Trapped | 6-80m | 2/5 | $40-60 | $20-30 each | Compact size, quick band changes | Limited bandwidth, lower efficiency | Mobile operation, portable setups, HOA restricted |
| G5RV | 80-10m | 2/5 | $30-50 | $80-195 | Multi-band coverage, smaller than full 80m dipole | Requires tuner on most bands, high SWR | Multi-band operation with moderate space |
| ZS6BKW | 40-10m (some 80m) | 2/5 | $40-60 | $100-180 | Better performance than G5RV, fewer tuner requirements | Ladder line affected by rain, height sensitive | DX operation, multi-band use without constant tuning |
| Yagi-Uda | 3 MHz – 3 GHz | 3/5 | $30-60 | $80-100+ | High gain, excellent directivity | Narrow bandwidth, complex installation | Long-distance point-to-point, satellite communications |
| Ground Plane | All bands | 1/5 | $25-40 | $40-250+ | Simple construction, omnidirectional pattern | Requires adequate ground plane, noise susceptible | Fixed base stations, mobile applications |
| Roll-Up J-Pole | VHF/UHF | 3/5 | $25-35 | $30-60 | Ultra-portable, no radials needed | Performance affected by surroundings | Portable operations, emergency communications |
| Rubber Duck | 150 MHz – 5 GHz | 1/5 | N/A | $20-60 | Extremely compact, durable | Significantly reduced gain, narrow bandwidth | Handheld transceivers, local communications |
I’ve found that difficulty ratings can be a bit subjective – what’s easy for me might be challenging for you, especially if you’re just starting out. That said, I’ve tried to be as objective as possible with these ratings based on the typical skills needed. The dipole and ground plane antennas are genuinely easy first projects, while something like the roll-up J-pole requires more finesse with the construction.
Cost is another thing that varies pretty widely depending on what materials you already have and where you source things. The ranges I’ve given here are based on typical costs if you’re buying most materials new. If you’re like me and have a junk box full of wire, connectors, and other random parts, you might build these for a fraction of the costs listed.
Conclusion: Types of ham radio antennas
Look, I’ve tried pretty much every antenna on this list over the years, and I can tell you this much – there’s no single “perfect” antenna for everyone. It all comes down to your specific situation, budget, and what you’re trying to accomplish on the air.
If you’re just getting started, I highly recommend going with either a simple wire dipole or a G5RV like the MFJ-1778 G5RV. If you prefer building, they’re incredibly easy to build (even with minimal skills), they’re dirt cheap at under $40 for materials, and they actually work really well when properly installed. I built my first dipole with some wire from the hardware store and a couple of insulators I made from PVC pipe scraps. It wasn’t pretty, but it got me contacts across the country. If you want the best in this class, get the ARS-10098 G5RV Pro ZS6BKW optimized with 1:1 Balun.
For those of you dealing with space limitations (I feel your pain – I operated from an apartment for years), the End Fed Half Wave is probably your best bet. The ability to run the wire in all sorts of creative configurations saved my ham radio hobby when I had minimal outdoor space. I also had very good results from a G5RV Jr if you have a little more room than an apartment. I also really like the G5RV Jr because being shorter, it is a LOT easier to handle and get set up for the first time user.
When it comes to build vs buy, here’s my take – if you’re reasonably handy and enjoy tinkering, build your first few antennas yourself. Not only will you save money, but you’ll also gain a much better understanding of how they work. Commercial antennas usually cost 2-3 times more than DIY versions, but they do save you time and sometimes come with better hardware. Buying also allows you to spend more time on the air and less time fiddling with things, which is important to a lot of people.
The single biggest factor in antenna performance? Height. I can’t tell you how many times I’ve seen hams spend hundreds on fancy antennas, only to mount them six feet off the ground. A basic wire dipole at 30 feet will absolutely crush an expensive commercial antenna at 10 feet. Get that radiator up as high as you possibly can!
For the portable operators out there, don’t overlook the roll-up J-pole or a lightweight EFHW. I’ve made contacts over 1,000 miles with a roll-up J-pole hanging from a tree branch during a camping trip. On the other hand, if you’re chasing DX contacts, you’ll probably want to look at verticals or Yagi directional arrays.
Remember this – experimentation can be half the fun in ham radio. I’ve built dozens of antennas over the years, some worked great, others were complete failures. Each one taught me something valuable. The perfect antenna for your station needs to balance your specific space constraints, the frequencies you want to work, and your personal operating goals.
If I had to recommend one antenna for someone getting into HF, I would probably go with the G5RV Jr as it presents the best balance of space used, cost, performance, and ease of installation. I don’t like a one-size-fits-all approach, but some people really want to be given one choice to make things easy. If you have a little bit of a yard and want to get up on HF fast and easy, this will do it.
What’s been your experience? Which antenna has worked best for your situation? Share your stories – your successes and failures might help another ham make better choices for their setup.