
Meshtastic enables encrypted communications over distances of 11 kilometers with uninterrupted line of sight. Setting up this powerful technology is surprisingly simple.
A LILYGO® TTGO Meshtastic T-Beam board costs just $30 and ships with pre-installed software. The devices are equipped with AES256 encryption to ensure secure communications between authorized radios. A single 18650 battery powers these units for days without charging, and solar cells can keep them running indefinitely.
This piece covers the complete setup process for T-Beam, Heltec V3, and T-Deck hardware. You’ll learn everything about antenna installation, firmware updates, and message configuration to optimize your device’s performance in off-grid conditions.
Ready to set up your Meshtastic network? Let’s take a closer look at the setup steps that will get you started quickly.
Choose Your Device: T-Beam, Heltec V3, or T-Deck

Image Source: Jeff Geerling
Picking the right Meshtastic device is vital to meet your needs. Each piece of hardware gives you different benefits based on how you plan to use it, where you’ll use it, and what technical features you need.
T-Beam: Best for GPS and range
The LILYGO® T-Beam stands out as the most versatile option for outdoor enthusiasts who need location tracking. This device has built-in GPS and delivers excellent range for long-distance communications.
Most T-Beam models come with an 18650 battery holder on the back that works with unprotected flat-top cells. This power setup lets you run the device longer than smaller options. The newer T-Beam models with the SX1262 LoRa chip work better than older SX1276 versions.
You can choose from these T-Beam versions:
- T-Beam v1.1: Has ESP32 microcontroller, SX1276 LoRa transceiver, and NEO-6M GPS receiver. You’ll need to solder the 0.96-inch OLED display.
- T-Beam with M8N: Better GPS module (NEO-M8N) that supports GPS, GLONASS, Galileo, and BeiDou for improved GPS sensitivity.
- T-Beam S3-Core/Supreme: Comes with ESP32-S3 with Bluetooth 5LE, SX1262 LoRa transceiver, and your choice of NEO-M10S or Quectel L76K GPS modules.
T-Beam works great for location tracking and long-range communication. A user shared this insight: “Of all of these, the T-Beam is the best bang-for-your-buck if you want a mobile radio that you can pop an 18650 battery into and go”. Users report they can communicate several miles apart even with trees and hills in the way. If you need a case, you can get one here.
Heltec V3: Compact and affordable
The Heltec LoRa 32 V3 makes a great starting point if you want something portable and budget-friendly. This small device uses an ESP32-S3FN8 microcontroller paired with an SX1262 LoRa transceiver.
The Heltec V3 doesn’t have built-in GPS, but it offers these features:
- Built-in OLED display
- 2.4GHz WiFi and Bluetooth 5.0 connectivity
- IPEX to SMA antenna adapter in the box
- Small size that fits anywhere
You can power the Heltec V3 through its USB-C port or battery connector, but it doesn’t have a built-in battery holder like the T-Beam. Many people choose this device because it’s affordable, especially when setting up multiple nodes.
The ESP32 inside uses more power than you might expect. Many users set up the Heltec V3 as a plugged-in router instead of running it on battery power. Remember that it doesn’t work with USB-C Power Delivery when planning your power setup. If you need a case you can get one here.
T-Deck: Built-in keyboard and screen
T-Deck takes Meshtastic devices to the next level by working on its own without needing a smartphone. This pocket-sized device comes with:
- 2.8-inch IPS LCD touch screen (320×240 resolution)
- Keyboard and trackball built right in
- ESP32-S3 dual-core processor with WiFi and Bluetooth 5 LE
- SX1262 LoRa transceiver (you can get 433/868/915MHz versions)
- Built-in speaker and microphone
The basic T-Deck doesn’t have GPS, but you can get one to add in such as the ATGM336M. The T-Deck has a U.FL/IPEX antenna connector for LoRa communications.
T-Deck really shines because it works completely by itself. An enthusiast pointed out: “It’s the first truly-standalone Meshtastic node that would be useful in an emergency”. You can use special keyboard functions too – press alt and c to enable function key mode for more shortcuts.
The Web Flasher tool works best to flash firmware onto the T-Deck. Just pick “T Deck” from the device menu.
Each device has its sweet spot. T-Beam works best for outdoor adventures where you need GPS and maximum range. Heltec V3 makes sense for affordable compact nodes. T-Deck gives you a complete communication device with its own interface. Pick the one that matches your communication needs, power requirements, and where you’ll use it. If you need a case, you can get one here.
Powering Your Device: Battery and Solar Options
Power management forms the foundation of a reliable Meshtastic network. This becomes even more crucial during field deployments or emergencies. Your specific needs will determine which power option works best.
Choosing and using 18650 batteries
Many Meshtastic devices, especially T-Beam models, rely on 18650 batteries as their main power source. These lithium-ion cells give you the perfect mix of power capacity and compact size.
Here’s what to look for in batteries:
- Capacity: Go for higher capacity ratings—usually 3000mAh (rated) to 3450mAh (typical)
- Dimensions: T-beam models need unprotected flat-top 18650 cells that match the original 18650 specs
- Voltage characteristics: These cells reach 4.2V at full charge and typically drop to about 3.3V
- Manufacturer: Samsung cells are the best, Sanyo are also good, just make sure you get them from a reputable seller as they are often faked.
It’s worth mentioning that button-top and protected cells are usually too long at over 65mm (sometimes reaching 70mm), so they won’t fit in standard T-beam battery holders. Your battery choice affects how long you can use the device. High-capacity cells like the Samsung 30QP help your device run much longer in the field.
You can get better battery life by turning on power-saving mode in your device settings. This shuts off Bluetooth, serial connections, WiFi, and the screen. This feature really helps devices running on limited power sources like solar panels.
USB power vs. battery power
USB and battery power each shine in different situations:
USB Power Advantages:
- Steady power flow for fixed installations
- No need to swap batteries
- Perfect for indoor router nodes
Battery Power Advantages:
- Freedom to move without power cords
- Great for field use
- Better option for emergency comms
Portable charging banks create an interesting challenge with USB power. These banks often shut off when they detect low power usage, which cuts off your Meshtastic device. This happens because these devices use very little power—about 15mA. Some users fix this by adding a small resistive load (like a 100 ohm resistor) to bump up power use to 53mA, which keeps the power bank running.
Devices with power management units (PMUs) let you set up automatic shutdown if external power stops. Just make sure your board shows the “🔌” icon in the app to confirm it detects external power correctly.
Solar charging setups for off-grid use
Solar power offers the best solution for keeping off-grid Meshtastic nodes running long-term. You can choose from ready-made or DIY options:
Pre-built Solar Solutions:
- WisMesh Repeater Mini comes with a 3200mAh Li-Ion battery and built-in solar panel, made just for Meshtastic off-grid use
- LowMesh Pocket-S includes a 6.6V/0.8W solar panel paired with a 2000mAh LiPo battery
These ready-to-use solutions make solar setup hassle-free while delivering reliable power. The WisMesh Repeater Mini works as a dedicated Meshtastic relay node, keeping your network connected through solar power.
If you’re building your own solar setup, think about:
- Solar Panel Size: This refers to the physical dimensions and power output of the solar panel. Larger panels can produce more electricity, but they also take up more space.
- Device’s Power Needs: Every electronic device requires a certain amount of power to operate. For example, a small device like a phone charger needs less power than a larger device like a refrigerator. It’s important to know how much power your device uses to select a suitable solar panel.
- Local Sun Exposure: This means the amount of sunlight your location receives. Areas with more sunlight will generate more electricity from solar panels compared to places with less sunlight. Factors like weather, seasons, and geographical location can affect sun exposure.Matching solar panel size to your device’s power needs and local sun exposure
- How power-saving mode can help—the Heltec Wireless Tracker uses just 1% battery per hour after finding GPS
A solar-powered Meshtastic node can run forever with the right setup and good sunlight. This makes solar power ideal for remote repeaters or fixed nodes where changing batteries would be tough.
Some suggested solar solutions might include:
1. Adafruit Solar Charger Bundle
Panel: 6V 2W (or 6V 3.5W) solar panel
Battery: 3.7V LiPo (1200–2500mAh)
Charger: Adafruit USB / DC / Solar Lithium Ion/Polymer charger (MCP73871-based)
Pro: Safe, reliable, handles solar charge and output well
Con: Slightly more expensive, DIY wiring required
2. Voltaic Systems V15 / V25 Battery Pack with Solar Panel
Rugged, waterproof
V15: 4,000mAh | V25: 6,400mAh
Solar panel options from 3.5W to 6W
Good for long-term deployments
3. DFRobot Solar Power Manager + 6V Panel
Solar Power Manager 5V or 3.7V version
Works with 18650 or LiPo batteries
Includes load output, charge control
6V 3W solar panel is a good match
Your power management settings will have a big effect on battery life. Adjust these based on how you plan to use the device and what power sources you have available.
Install the Antenna and Optional Display
Selecting and installing the right antenna is vital to get the best performance from your Meshtastic device. Your next step after powering up the unit is to set up these key components that ensure reliable communication.
Why antenna installation matters
The stock antennas that come with most Meshtastic devices usually come from “mixed bags” and might not work well with your specific frequency range. This mismatch can substantially affect your device’s performance in several ways:
Your antenna needs to match your transceiver frequency for good communication. You’ll get maximum signal efficiency by using an antenna tuned to your region’s frequency (868MHz for Europe, 915MHz for USA). The antenna’s design also affects:
- How well the signal transmits
- Where the signal goes
- How it might interfere through horizontal or vertical polarization
- Signal bouncing back to the device
Critical warning: Don’t run any Meshtastic device without an antenna or with a poorly matched one. Radio signals without a proper antenna can bounce back and damage your device.
The quality of antennas varies a lot. Many online sellers list antennas that don’t match what they claim about frequency band or gain factor. You’ll get better reliability by buying from reputable brands through official channels.
The way you position your antenna makes a big difference in how far you can communicate. Here’s how to mount it:
- Straight up for standard omnidirectional performance
- As high as possible (best if it’s outside, above buildings)
- Make sure the antenna element extends above the mounting pole if you’re using one
You should think about upgrading from the stock antenna if you want maximum range. The included antenna might work fine in cities, but you’ll see huge improvements with a quality antenna if you’re dealing with hills, buildings, or less populated areas.
Some suggested antennas include:
✅ 1. Portable Antennas (On-the-go Use)
📡 Diamond SRJ77CA Dual Band (UHF/VHF)
Band: Works well with 433 MHz
Length: 15″
Gain: ~2.15 dBi
Connector: SMA-F or SMA-M (check your board) may need adapters
Pros: Lightweight, better than stock
Cons: Dual-band, so not fully optimized for LoRa only
📡 433 MHz Stubby Antenna
Length: ~13cm
Gain: ~3 dBi
Connector: SMA
Pros: Very compact, decent performance for short range, joint for better directionality
Good for: Hiking, pocket nodes
🚗 2. Mobile Antennas (Vehicle-mounted)
📡 Nagoya UT-72G Magnetic Mount Antenna
Band: 433 MHz compatible
Gain: ~3.15 dBi
Length: 19″
Connector: SMA & SMA female also may need adapters
Pros: Comes with magnetic base, ~3m RG58 cable
Cons: Needs metal surface to mount
📡 Tram 1181 Amateur Dual-Band Magnet Antenna
Gain: ~3.5 dBi
Connector: UHF (PL-259) → need SMA adapter
Pros: Strong magnet, great mobile performance
🏠 3. Fixed Installations (Base Node, Discreet Size)
📡 Waterproof 5.8dBi Lora 915MHz Fiberglass Antenna
Band: 915 MHz
Length: ~40cm
Gain: 5.8 dBi
Mounting: Includes U-bolt mount
Connector: N-type to RP-SMA male with RP-SMA to SMA male adapter
Pros: Weatherproof, durable, solid range, includes cable
📡 Bingfu LoRa Fiberglass Antenna
Band: 915 MHz
Gain: 3 dBi
Length: ~35cm
Connector: N-type to RP-SMA male with RP-SMA to SMA male adapter
Pros: Budget-friendly, good size for home
⚠️ Notes on Compatibility
LilyGO T-Beam usually has SMA female, so you’ll need SMA male antennas or adapters.
Heltec V3 uses IPEX/U.FL → get a U.FL to SMA pigtail to use external antennas.
Ensure frequency match: 433 MHz for EU/Asia, 915 MHz for US/CA/AU.
The coaxial cable that connects your antenna needs attention too. These frequencies lose signal strength with every meter of cable. You’ll get better results by putting your Meshtastic node in a waterproof container with the antenna directly attached, or by using high-quality microwave cable like LMR400 (keep it short).
Note that sometimes you will not be able to find an appropriate antenna in the frequency range you need. Often times, you can use an antenna made for a different frequency. A good 400MHz antenna will not be optimized for 900MHz, but it will certainly work better than the cheap rubber ducky that came with your T-Beam. Don’t be afraid to experiment.
Display module: When and how to add it
Not every Meshtastic device has a built-in display. The Heltec V3 and T-Deck come with screens, but many T-Beam models need optional display modules.
A display helps you:
- See connection status without a phone
- Check battery levels and GPS coordinates
- Fix connectivity issues
- Use it as a standalone communication device
T-Beam devices usually work with a 0.96-inch OLED display. You’ll need basic soldering skills to connect the display to your board’s pins. Many T-Beam v1.1 models have mounting pins made specifically for these displays.
Make sure you connect to the right pins on your board. You’ll typically connect four wires:
- VCC (power)
- GND (ground)
- SDA (data)
- SCL (clock)
RAK Wireless Meshtastic kits work with the RAK1921 SSD1306 OLED Display Module. These modules plug into the WisBlock base without needing extra parts beyond the display module.
The Meshtastic firmware detects and uses compatible displays automatically once they’re connected. You can still adjust display settings like sleep timing and what information shows up through the Meshtastic app.
Screens use extra power, so you might want to disable or remove the display if battery life matters more than having a screen.
Once you’ve set up your antenna and display, you can flash the Meshtastic firmware (if it’s not already there) and start setting up your device to work best in your environment.
Flash the Meshtastic Firmware
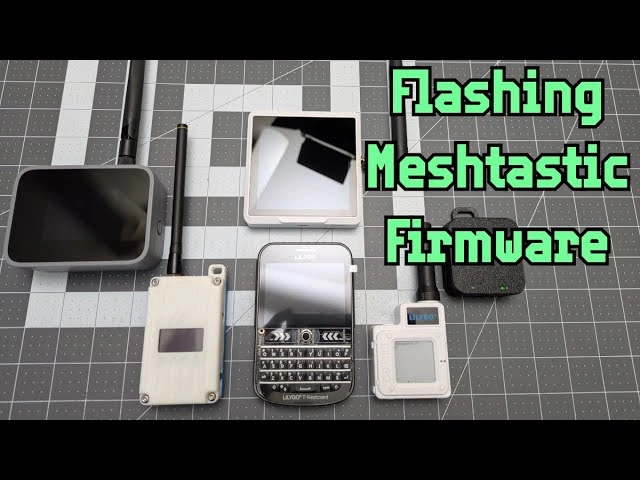
Image Source: YouTube
Your device becomes a functional Meshtastic node after flashing the firmware. You need to pay close attention to this crucial step to make sure your device works correctly with the latest features.
Using the web flasher (Chrome/Edge)
The web flasher offers the quickest way to install Meshtastic firmware, especially when you’re just starting out. You’ll need Chrome or Edge browser to begin with, since the flasher doesn’t work with Firefox or other browsers.
Here’s how to flash your device using the web flasher:
- Make sure your device connects via USB (check if you’re using a data cable, not just a power cable)
- Head to flasher.meshtastic.org
- Pick your target device from the dropdown menu
- Select either “Stable” or “Unstable (Alpha)” firmware
- Choose whether to do a full erase (we recommend this for first-time installation)
The auto-detect feature helps if your device already runs Meshtastic. Remember to pick the right firmware for your specific device—wrong firmware might leave your device unresponsive even if the flash seems successful.
Flashing with the CLI
The Command Line Interface (CLI) gives you more control over the flashing process than the web flasher. Better yet, it works on all operating systems.
Here’s what you need for CLI flashing:
- Python and pip should be on your system
- Get esptool by running:
pip3 install --upgrade esptool - Check if your device communicates by running:
esptool chip_id - Get the right firmware from the Meshtastic downloads page
Head to your firmware directory and run the right command for your device. Add the --web option to include the embedded Web Client during installation.
Linux/macOS users with an ESP32 device can run:
esptool.py --chip esp32 write_flash 0x0 firmware.factory.bin
Multiple connected devices need port specification:
esptool.py -p /dev/ttyUSB0 --chip esp32 write_flash 0x0 firmware.factory.bin
Device-specific flashing tips
Each Meshtastic-compatible device needs its own approach:
T-Beam considerations:T-Beam 0.7 needs its own firmware file (firmware-tbeam0.7-X.X.X.xxxxxxx.bin) that’s not compatible with other T-Beam versions (firmware-tbeam-X.X.X.xxxxxxx.bin).
Heltec devices:Heltec V3 users should press and hold the “Program” button while hitting “Reset” for flash mode. Look for the “esp32s3” firmware variant in downloads.
nRF52 and RP2040 devices: These devices keep things simple with drag-and-drop installation. You won’t need any drivers or software on any platform. A factory erase before installation helps clear data that might change between releases.
T-Deck:Just pick “T Deck” from the Web Flasher’s device dropdown menu.
Common flashing errors and fixes
Let’s look at typical problems you might face:
Connection failures: A stuck “Connecting…” message means you should:
- Hold device buttons while connecting USB
- Try the “1200bps Reset” option
- Update your USB drivers (ESP32 devices usually need Silicon Labs CP210x)
Incorrect firmware errors: Wrong firmware can lead to:
- Screens going blank
- Devices not responding
- Strange fault codes on screen or serial output
Wrong firmware? Flash the bootloader first, then put the application firmware back on.
Serial port issues: Devices stuck outside DFU mode but visible as serial ports need:
- Baud rate set to 1200
- Multiple connect attempts until the green light stays solid
Device not recognized: Can’t see your device? Try these:
- Switch to different USB cables (data transfer capable ones)
- Check for proper driver installation
- Test other USB ports
Your device will reboot automatically after successful flashing. Now you’re ready to connect it to the Meshtastic app.
Connect to the Meshtastic App
The Meshtastic app unlocks your node’s full potential once you’ve flashed the firmware. Your device needs a solid connection between the hardware and its setup interface.
Pairing via Bluetooth
Your smartphone can connect to the device as soon as you power it on. Here’s how to set it up:
- Open the Meshtastic app on your smartphone
- Tap the “+” button in the bottom right corner to search for nearby devices
- Find your device name (usually shows up as “Meshtastic_XXXX” where XXXX is your unique identifier)
- Select your device from the available connections list
Keep in mind, Bluetooth on ESP32 devices shuts off automatically when WiFi is on. You might not see your device via Bluetooth if WiFi settings are active.
You can also connect through:
- WiFi or Ethernet (devices on the same network show up automatically)
- USB OTG connection (your phone detects it right away when plugged in)
Entering the pairing code
Your device’s configuration determines how pairing works. Meshtastic has three pairing modes:
- RANDOM_PIN: Creates a new PIN each time (default for devices with screens)
- FIXED_PIN: Uses a set code (default: 123456)
- NO_PIN: Removes PIN authentication completely
Devices with displays show the pairing code on-screen. Just type this code when your smartphone asks for it. Devices without screens or those flashed without one usually use “123456” as the default PIN.
Security-wise, you should change the default fixed PIN, especially if your device uses this mode. A custom six-digit code helps prevent unwanted access.
You can adjust your device’s Bluetooth settings here:
- Android: Vertical Ellipsis (3 dots) > Radio Configuration > Bluetooth
- iOS/iPadOS/macOS: Settings > Device Configuration > Bluetooth
The app’s status bar shows a check mark in the cloud icon once you’re connected.
Troubleshooting connection issues
Connection problems happen often but they’re usually easy to fix. Try these solutions:
When disconnections keep happening:
- Your phone might not reconnect to the node automatically when back in range. Go to the gear icon tab, switch to inactive, then pick the Bluetooth device again
If pairing fails:
- Remove the Bluetooth connection from your device’s system settings
- Start the pairing process fresh
- Put in the pairing code when asked
This reset helps protect against fake connections. While it might seem like extra work, it stops unauthorized reconnections without your knowledge.
For fixed PIN devices that won’t connect: The default PIN might not work. Here’s how to reset your device:
- Use USB to connect your device to a computer
- Open the web client (https://client.meshtastic.org) in Chrome or Edge
- Go to Config > Radio Config > Bluetooth
- Set the pairing mode to “Fixed pin” and choose your PIN
- Save and let your device restart
A cloud icon with a check mark appears in your device status once everything works properly.
Configure Your Device Settings
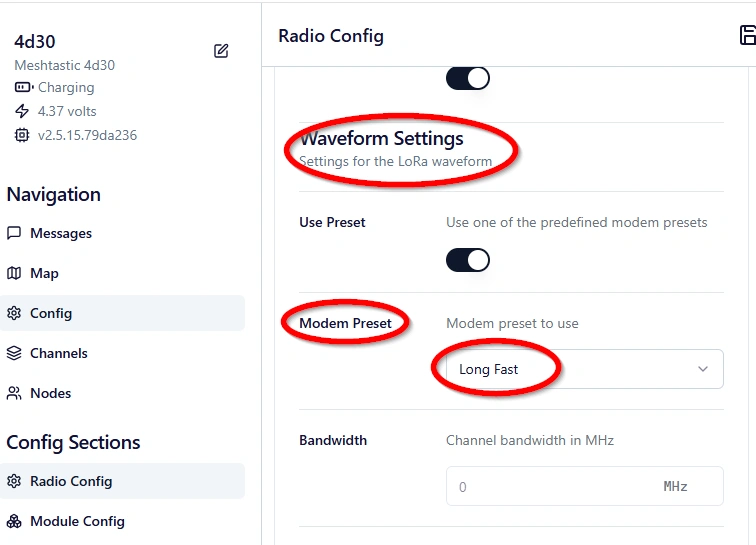
Image Source: RAKwireless Documentation Center
Your next vital step after connecting to the Meshtastic app is to set up your device settings. The right configuration will ensure legal compliance, personal identification, and the best performance from your Meshtastic node.
Set your LoRa region
You must set your device’s LoRa region before it can send any packets. New devices typically show “UNSET” as the default region. This vital setting determines your device’s frequency range and keeps you within legal limits for your location.
To set your region:
- Open the Meshtastic app
- Go to the settings menu
- Select Radio Configuration
- Tap Region and choose your appropriate code
Pick your region based on your country:
- US: United States (902-928 MHz)
- EU_868: European Union 868MHz (869.4-869.65 MHz)
- EU_433: European Union 433MHz (433-434 MHz)
- ANZ: Australia & New Zealand (915-928 MHz)
- JP: Japan (920.8-927.8 MHz)
This setting is legally required—your device will show a warning message and won’t transmit until you configure it properly. European regions have a 10% duty cycle limit that’s automatically enforced to prevent regulatory violations.
Name your device
The next step after region setting is to give your device a name that makes it easy to identify in your mesh network:
- Go to Device Configuration → User in the app
- Find the Long Name field to set your primary identifier
- Set a Short Name for more compact display on other devices
The system creates both names automatically, but custom names make it easier to identify multiple nodes. Ham operators with licenses should use their call sign as the Long Name and enable the Is Licensed option to comply with regulations.
Best practices for naming:
- Use descriptive but brief names
- Fixed nodes work well with location-based names
- Use similar patterns for multiple devices
Enable boosted gain (if supported)
Devices with the SX126x chip series (common in newer T-Beams and Heltec V3) support RX Boosted Gain to improve reception sensitivity:
- Go to Radio Configuration in the Meshtastic app
- Look for SX126x RX Boosted Gain option
- Toggle to enable
This feature uses slightly more power but gives better receiving capability. It’s especially useful in tough environments with weak signals or when nodes are far apart.
Note that your device will restart automatically after you change important radio settings. Some settings might create a new encryption key, so you’ll need to share your channel information again with other devices in your network.
Test Communication and Send Your First Message
Your device is powered up, connected, and configured. The next step is to test how it communicates through your mesh network. You’ll see the real value of Meshtastic once you start exchanging messages with other nodes.
Using the default channel
Meshtastic comes with a standard public channel by default. This main channel does two things:
- Distributes node information (runtime, location, battery status)
- Enables IP tunneling between nodes
The default channel isn’t encrypted, which means any Meshtastic device in range can see your messages. You can create additional channels with passwords that encrypt communications using AES256-CTR—we’ll cover this in later sections.
Most users should stick to the default “LongFast” channel when they start. This makes it easier to connect with other Meshtastic users nearby.
Sending and receiving messages
Here’s how to send your first message:
- Go to the “Messages” section in your Meshtastic app
- Select the default Primary channel
- Type a simple test message like “Testing, anyone copy?”
- Tap send and watch the status indicators
The app shows helpful status icons after sending. A cloud icon means your message is waiting to go from the app to your node. Once your node gets it, a new icon shows it’s ready to travel through the mesh.
You’ll see “Ack” (acknowledged) instead of “max trans reached” when another node receives your message. This confirms your mesh connection works.
Understanding signal strength and hops
Signal strength indicators tell you vital information about your network layout. Nodes with signal strength bars show direct connections—these are your “hop 0” nodes. These direct links create your mesh network’s foundation.
Meshtastic moves messages through the network with a simple “flooding” algorithm. Each node passes messages to its neighbors. Messages carry a Time-To-Live (TTL) value that drops by one each time a node forwards it. This stops messages from circulating forever.
Messages start with a TTL of 3 by default. This means they can travel through three nodes from where they started. The nodes showing as “3 hops away” mark the edge of your network’s reach.
Optional Features and Enhancements
Your Meshtastic network becomes more versatile with additional features beyond simple functionality. These optional upgrades expand your system’s capabilities without the need to reconfigure everything from scratch.
Adding GPS modules
The Heltec V3 and other devices support external GPS module upgrades that provide location tracking capabilities with your existing hardware. Most ESP32-based boards work seamlessly with GT-U7 and GY-NEO6MV2 modules, I like to use ATGM336H modules in my T-Decks as they fit in the case better.
The external GPS module installation requires these pin connections:
- GPS VCC → 3V3 on your board
- GPS RX → GPIO 46 (for Heltec V3)
- GPS TX → GPIO 45 (for Heltec V3)
- GPS GND → GND
The Meshtastic app needs configuration once connections are complete:
- Go to Settings > Device Configuration > Position
- Set GPS Receive GPIO to 45 and GPS Transmit GPIO to 46 for Heltec V3
Your device’s battery life might decrease since GPS modules draw additional power.
Creating encrypted channels
The Meshtastic platform supports multiple communication channels with different encryption levels. Each device supports up to 8 channels (indexed 0-7) with distinct roles:
- PRIMARY: Carries periodic broadcasts like position and telemetry
- SECONDARY: Supports modified encryption keys
- DISABLED: Makes channel unavailable
A private encrypted channel setup requires these steps:
- Go to Channel settings in the app
- Select “default” (publicly known key) or “random” (secure AES256 encryption)
- Pick your preferred position precision based on location privacy needs
The “random” PSK setting ensures true security since default keys remain publicly accessible.
Sharing channels via QR code
The Meshtastic platform makes configuration sharing simple through QR codes with channel settings:
- Android users can use the QR scanner while iOS users should use their camera
- QR code creation requires careful selection between “Add Channels” or “Replace Channels”
- The “Replace” option might overwrite your existing channels, so choose carefully
The Python CLI offers an alternative approach:
meshtastic --ch-add "ChannelName" --ch-set psk "NA=="
meshtastic --qr-all
Network security depends on scanning QR codes exclusively from trusted sources.
Conclusion
Setting Up Your Meshtastic Network: Final Thoughts
Building a working Meshtastic network needs you to focus on a few important parts. The good news is that beginners won’t find it too hard to get started. Your choice of hardware – T-Beam, Heltec V3, or T-Deck – will shape how you use the network. Each device has its strengths, from GPS features to size and standalone use.
The way you handle power affects how long and well your network runs. 18650 batteries work great for portable power, and solar panels keep remote nodes running forever. Your network’s range depends on the quality of antennas and how well you install them. Good components make all the difference here.
The technical side includes loading firmware, setting up devices, and creating channels. You’ll need to pick the right LoRa regions to follow local rules before you test node communication. If security matters to you, encrypted channels with custom PSK settings work better than the default ones.
A working Meshtastic network lets you communicate without relying on regular cell towers or wifi. The Meshtastic community forums are a great place to learn new tricks and meet other users worldwide. Adding more nodes in the right spots helps your mesh network work better, especially in tough terrain.
These devices don’t cost much and are really flexible. They’re perfect for emergency backup, outdoor trips, or if you want to learn about mesh networks. You might want to test how far your signals can reach, try different antennas, or add MQTT bridges to expand what your network can do.
FAQs
Q1. What frequency should I use for Meshtastic in the United States? For Meshtastic devices in the US region using default settings, the recommended frequency for antenna tuning is 906.875 MHz.
Q2. How do I set up the correct region for my Meshtastic device? To set your Meshtastic region, open the Meshtastic app, go to Radio Configuration, select the Region option, and choose the appropriate region code for your location (e.g., US for United States, EU_868 for European Union).
Q3. What’s the process for connecting a smartphone to a Meshtastic device? Open the Meshtastic app on your smartphone, tap the “+” button to search for nearby devices, select your device from the list, and enter the pairing code displayed on your Meshtastic device (or use the default code 123456 for devices without screens).
Q4. Which Meshtastic devices are recommended for beginners? For beginners, popular plug-and-play options include the LILYGO T-Beam (best for GPS and range), Heltec LoRa 32 V3 (compact and affordable), and T-Deck (built-in keyboard and screen). Choose based on your specific needs for features like GPS, battery life, or standalone operation.
Q5. How can I create a secure, encrypted channel in Meshtastic? To create a private encrypted channel, go to Channel settings in the Meshtastic app, select “random” for the PSK (Pre-Shared Key) setting to use secure AES256 encryption, and adjust the position precision for location privacy. Avoid using the “default” key option for truly secure communications.