
Fox hunting in the ham radio world has fascinated me for years. It’s amazing how the gear ranges from simple “body fade” techniques that cost nothing to fancy directional equipment that can pinpoint signals within a single degree of accuracy. This hobby has grown so competitive that there are actual fox hunting championships held around the world, which I find both impressive and slightly amusing.
At its most basic level, fox hunting is about finding a hidden transmitter (the “fox”) that sends out a beeping tone every few seconds. Think of it as hide-and-seek with radios. As hunters gain experience, most of us end up upgrading our equipment. The serious enthusiasts I’ve met swear by specialized Yagi antennas – often homemade using PVC pipe, hose clamps, and ordinary tape measures – paired with offset attenuators that can dial down signals from 20 dB all the way to an impressive 100 dB or more.
I’ve noticed that fox hunting techniques change dramatically depending on terrain and distance. Most hunts I’ve participated in take place on fairly short-range 2m/70cm bands, although some hardcore enthusiasts go after foxes on the 80-meter HF band, covering much larger areas. When you get close to your target, you’ll need to employ some clever signal dampening tricks like the third harmonic technique to maintain accurate direction finding.
One thing I should make clear right away – there’s no “standard” setup for on-foot hunts in the USA. From my experience, if you’re just starting out, a three-element Yagi antenna and a basic attenuator will serve you well. For those ready to invest a bit more, frequency-synthesized receivers like the Sniffer 4 (a favorite among ARDF Team USA members) cost just over $200 and offer significant advantages over the improvised setups many beginners start with.
What is Ham Radio Fox Hunting?
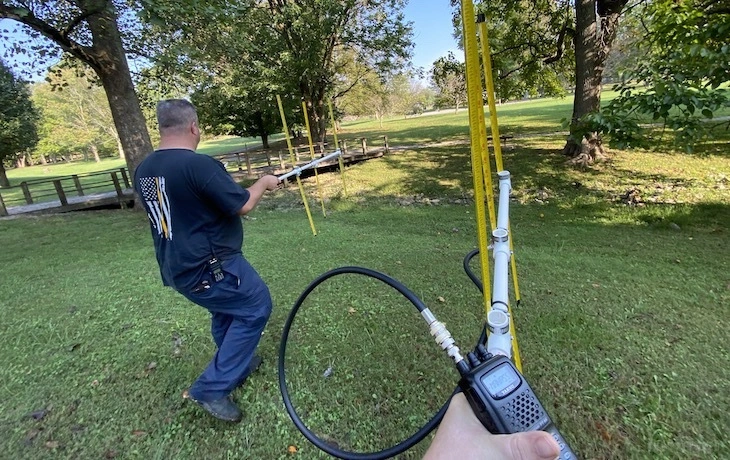
Image Source: The Prepared
I’ve been involved with ham radio for years, and fox hunting remains one of my favorite activities. It’s essentially a unique blend of technology and outdoor adventure where participants locate hidden radio transmitters – no actual foxes or animals involved! Instead, we radio enthusiasts use specialized techniques to track down small transmitters hidden within a designated search area. What makes this so engaging is how it combines technical skills with the thrill of the chase.
How it works and what it’s used for
Fox hunting (also called transmitter hunting or hidden transmitter hunting) follows some pretty straightforward rules. Before a hunt begins, you’ll typically get information about the transmitter’s frequency and the boundaries of your search area. The “fox” (our hidden transmitter) usually beeps intermittently, and you’ll need to track it down using radio direction finding (RDF) equipment.
From my experience, the sport comes in several flavors:
| Format | Range | Transportation | Equipment |
|---|---|---|---|
| Mobile | City/County-wide | Vehicles | Vehicle-mounted antennas, handheld devices |
| On-foot | Parks, small areas | Walking | Handheld RDF equipment, directional antennas |
| ARDF | Wooded areas | Running/Walking | Map, compass, RDF equipment |
Here in North America, I’ve noticed mobile hunts are particularly popular. During these events, folks mount equipment on their vehicles or deploy antennas through windows to track signals while driving. These hunts cover substantial territory, sometimes spanning entire cities or counties. Winning means either being first to find the transmitter or traveling the shortest overall distance.
On-foot hunts are my personal favorite. They’re usually held in smaller areas like public parks, with everyone competing entirely on foot. You’ll often find these organized alongside radio club meetings or conventions.
There’s also a more formalized version called Amateur Radio Direction Finding (ARDF), which has international recognition and features Olympic-style competitions with proper medal ceremonies. ARDF combines orienteering with radio direction finding in timed races through various terrain. I’ve participated in a few of these, and they’re quite challenging!
The basic technique we use in any fox hunt is triangulation—taking signal readings from multiple locations to figure out where the transmitter might be. I’ve found the challenge gets trickier as you get closer to your target since the signal becomes stronger and harder to directionally pinpoint.
Real-world applications beyond the sport
I think what makes fox hunting truly worthwhile is how these skills transfer to real-world situations. This isn’t just a game – it’s practical training.
First and foremost, direction finding skills are absolutely crucial for search and rescue operations. Teams can locate downed aircraft by tracking emergency beacons on 121.500 MHz (civilian) or 243.000 MHz (military) frequencies. I’ve seen these same techniques used to find lost or injured hikers carrying transmitters in wilderness areas.
Secondly, these methods help identify and track down sources of radio interference. Whether it’s unintentional interference from faulty equipment or deliberate jamming, these skills help maintain the integrity of amateur radio, public safety, and commercial radio systems. I’ve personally helped locate “stuck” transmitters that were disrupting normal communications.
This dual nature as both sport and practical skill makes fox hunting particularly valuable in our ham community. Many local radio clubs organize regular hunts specifically to develop these abilities. Through these events, you’ll not only have fun competing but also prepare for potential emergency scenarios where direction finding skills might save lives.
Fox hunting serves as an engaging way to build teamwork, organizational skills, and familiarity with local geography—knowledge that proves incredibly useful during emergency operations. This blend of recreation and readiness really captures the essence of ham radio culture: having fun while developing capabilities that could someday serve the public good.
Essential Gear to Get Started
Image Source: YouTube
Let me walk you through the gear you’ll need to start fox hunting. The good news is that you really only need three basic components: a receiver to pick up the signals, an antenna to figure out which direction they’re coming from, and some way to reduce strong signals when you get close to the target.
Handheld radios and scanners
Any fox hunting setup starts with a decent receiver. If you’re just getting started, you probably already own what you need:
I’ve used standard handheld transceivers (HTs) for years with great success, especially ones that have signal strength meters to help gauge how close I am to the transmitter. Sure, the premium radios from Kenwood, Icom, and Yaesu give you better performance and less signal overload, but I’ve seen plenty of beginners do just fine with even a Baofeng UV-5R.
Here’s something interesting I’ve discovered – old programmable scanners actually offer some serious advantages over regular ham radios for fox hunting:
- They have real squelch knobs you can turn for precise signal control
- They can’t transmit (which is actually helpful if you have non-licensed folks joining the hunt)
- You can pre-program fox frequencies in 4MHz increments
- You can find them dirt cheap – often just $1-10 at thrift stores and garage sales, or below $50 on ebay.
When shopping for a receiver, look for one that shows signal strength and lets you connect external antennas. I have had not been very successful finding inexpensive scanners with signal strength indicators, YMMV. Dual-band capability (2m/70cm) gives you more options when you’re trying different tracking techniques. One of the most popular models you can still buy new is the Bearcat BC125AT which is an excellent unit, although not terribly inexpensive.
If you can forgo the signal strength meter, one of my favorite recommendations is the Bearcat BC60XLT because they are very reliable, lightweight, inexpensive ($20-$40 depending on condition) and I have never had anyone come back and tell me they couldn’t find one. Heck, I just did an eBay search and there are over 80 available right now!
Body shielding and signal nulling
The simplest technique I’ve used requires nothing beyond your radio and your body. It’s called “body shielding” or “body fade,” and it works surprisingly well:
- Hold your radio tight against your chest
- Rotate your body slowly in a complete circle
- Note where the signal becomes weakest (this is the “null”)
- The transmitter is located directly behind you at this point
What’s happening here is your body creates a basic directional detection system by blocking signals coming from behind you. I’ve had the best results with this technique in open areas away from large buildings, chain-link fences, and other metal objects that cause signal reflections.
When you get closer to the transmitter and the signals become overwhelmingly strong, I’ve used several tricks to reduce the signal:
- Just remove the antenna completely (if you can still hear the signal with no antenna, you’re extremely close)
- Tune 5-10 kHz off the transmitter frequency
- If you have a dual-band radio, try listening for the much weaker third harmonic in the 70cm band
- Wrap aluminum foil around the radio (but be careful not to short the battery terminals)
Basic directional antennas
Body shielding works in a pinch, but I consistently get much better accuracy with dedicated directional antennas. I’ve used two main types, and they serve different purposes:
Yagi Antennas: These forward-facing antennas provide gain in the direction they’re pointed. The tape measure Yagi has become my go-to homebrew option, built from:
- PVC pipe frame
- Hose clamps
- Flexible tape measure elements (which won’t break when you inevitably bang them into trees)
A basic three-element Yagi provides plenty of gain for most hunting scenarios while still being portable enough for field use. To use it, you simply point the antenna horizontally and rotate your body until you find the direction with the strongest signal.
Loop Antennas: Unlike Yagis, loop antennas excel at providing sharp signal nulls rather than peaks:
- They have a donut-shaped reception pattern with very narrow nulls
- While they offer less gain than Yagis, their nulls can be under 10 degrees wide (compared to a Yagi’s 60-75 degree beamwidth)
- I’ve used them in various sizes (18-inch VHF model effective up to 600 MHz, 11-inch UHF model effective up to 1 GHz)
From my experience and talking with other hunters, null-detection antennas like loops provide more precise direction finding than peak-detection antennas like Yagis, especially when you’re close to your target.
The most versatile setup I’ve put together contains both types—I use Yagis for initial signal acquisition and loops for precise final direction finding.
How to Build and Hide a Fox Transmitter
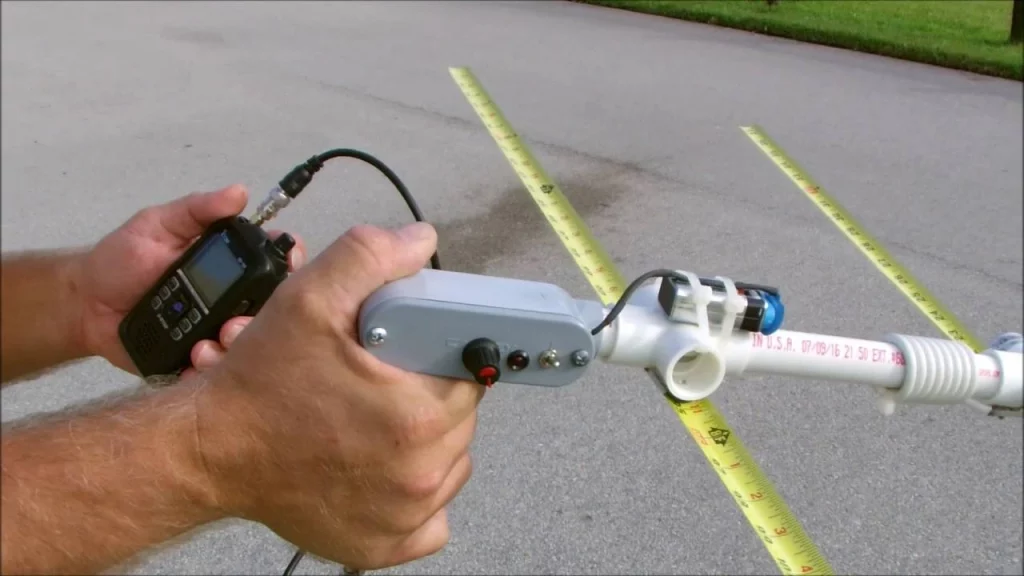
Image Source: Reddit
I’ve been on both sides of fox hunting – finding and hiding transmitters – and I can tell you that building a good fox is just as challenging and fun as tracking one down. If you’re interested in being the fox rather than the hunter, you’ve got several options ranging from commercial products to DIY setups. Your choice really depends on your technical skills and what kind of hunt you’re planning.
Choosing a transmitter and controller
When I first started creating fox transmitters, I was overwhelmed by the options. The simplest approach is to go with commercial solutions like the Byonics MicroFox line. These neat little devices come with everything you need – a frequency-agile 2-meter transmitter and a controller that lets you program the tones and timing patterns. With their 15mW output power, these transmitters work perfectly for walking hunts. I’ve found they can be detected from about 12 miles away when the hunter is using a decent directional antenna.
If you’re more of a tinkerer like me, building your own setup can be more satisfying. The most popular DIY approach I’ve seen involves pairing an Arduino microcontroller with a handheld radio. You’ll need:
- A programmable Arduino board (I recommend the Nano or Mega for complex setups)
- A relay module to key the microphone
- A Baofeng UV5R or similar radio as your transmission source
For those who want something in between, the HackerBox Fox Hunt Kit combines an ESP32 microcontroller with an SA818 radio transceiver module. What I like about this option is it works on either VHF (2m) or UHF (70cm) bands.
Some of my more technically-inclined ham friends use PIC microcontrollers with specialized transmitter modules like the SRB-MX146. These offer really precise frequency control through various programming methods – from simple binary switch selection to direct ASCII data configuration via I2C or SPI. Honestly, this is overkill for beginners, but it’s nice to know the option exists.
Using dummy loads and power settings
Getting the power level right is crucial when setting up a fox transmitter. I’ve seen too many hunts ruined by transmitters that were either too powerful or too weak. Here’s a simple breakdown of what I’ve found works best:
| Power Level | Typical Range | Best For |
|---|---|---|
| 1mW | Up to ¼ mile | Final stage of multi-transmitter hunts |
| 15mW | Detectable from ~12 miles | Walking hunts in parks |
| 100mW | City-wide coverage | Mobile vehicle hunts |
| 1W | Multi-city coverage | Large area hunts |
Most handheld radios have a 1-watt setting that works fine for fox transmitters, though I’ve noticed they can get pretty hot during continuous transmission. Mobile radios typically start at 5 watts minimum, so you’ll need to dial that down somehow.
One thing I can’t stress enough – always use a dummy load when testing and configuring your fox. I learned this lesson the hard way after accidentally causing interference during setup. A good dummy load will:
- Protect your transmitter circuitry by providing proper impedance matching
- Let you test signals without broadcasting
- Prevent you from being “that guy” who messes up the local repeater
A properly functioning dummy load should measure around 50 ohms between the center pin and outer shield. Simple test, but it could save your equipment.
Programming CW ID and timing
Every fox transmitter needs proper identification to stay legal with FCC regulations. Beyond that, getting the timing pattern right makes a huge difference in how enjoyable the hunt will be.
From the hunts I’ve organized, these timing configurations work well:
- Continuous transmission with periodic ID – good for beginners
- Alternating transmission/silence patterns (1 minute on, 4 minutes off) – adds challenge
- Sequential multi-fox setups where each transmitter activates in turn – for advanced hunts
For CW (Morse code) identification, your controller needs to store your callsign and transmit it regularly. I also like to add distinctive audio patterns that help hunters distinguish my fox from other signals. Some options include:
- Rising and falling tone sequences (my personal favorite)
- Distinctive beep patterns
- Audio frequencies that human ears pick up well (usually 300Hz-3kHz)
If you go with the Byonics option, their configuration software makes this part easy. The default settings – 15 seconds of tone followed by Morse code ID, repeated every 30 seconds – work well for most hunts. With Arduino-based controllers, you can program the timing directly in the sketch. I’ve even added DTMF control to mine so I can change transmission modes remotely.
Don’t have access to fancy controllers? No problem. Some of the most creative fox setups I’ve seen use basic 555 timers and decade counters with diode matrices to create different timing patterns. Simple but effective!
Building or Buying Hunting Equipment

Image Source: RadioReference.com Forums
When it comes to tracking down hidden transmitters, your choice of directional equipment can make or break your success. I’ve seen frustrated hunters fail simply because they picked the wrong tools for the job. The fox hunting community has developed some pretty specialized equipment over the years, and you’ve got options ranging from weekend DIY projects to commercial solutions.
Tape measure Yagi antennas
The tape measure Yagi has become my go-to antenna for most hunts. It’s durable, effective, and won’t break the bank. This three-element beam gives you approximately 7.3 dBd of gain with an impressive front-to-back ratio exceeding 50 dB. Its beamwidth measures 67.5 degrees in the E-plane and 110 degrees in the H-plane, creating what I’d call a moderately directional pattern.
You can build one with materials from any hardware store:
- Steel measuring tape (I prefer the 1-inch width)
- PVC pipe and connectors
- Hose clamps or cable ties
- RG-58 coax cable
I’ve learned the hard way that adding a choke balun (just wrap 7-8 turns of coax around the boom) really helps minimize pattern skew and cuts down on unwanted signal pickup. The finished antenna works like a shotgun rather than a rifle – perfect for getting that initial bearing when you’re first picking up the signal.
Offset attenuators and how they work
Here’s a problem every fox hunter faces eventually – you get close enough to your target that even a directional antenna becomes useless as signals overpower your receiver. This is where offset attenuators save the day through a clever bit of frequency conversion.
An offset attenuator creates a weaker, offset signal by mixing the incoming fox transmission with a local oscillator signal (typically 4 MHz). You then tune your receiver to the new frequency (original +/- 4 MHz) and adjust attenuation as needed.
The signal reduction capabilities are pretty remarkable:
- Minimum attenuation: around 30 dB
- Maximum attenuation: 72-82 dB depending on frequency
- Multiple harmonic offsets available when you’re extremely close
I’ve used both Arrow’s commercial offset attenuator ($60) and built my own DIY version for about $15. The commercial one has a nicer sine wave generator that creates less interference, but my homebrew version works just fine for most hunts.
Loop antennas and null detection
While Yagi antennas work by finding signal peaks, I’ve found loop antennas excel at something completely different – null detection. Instead of looking for where the signal is strongest, you find where it disappears. These shielded loops create sharp nulls perpendicular to the loop plane with some serious advantages:
- Extremely precise bearings (I can usually get within ±5 degrees at null points)
- Much less vulnerable to signal reflections thanks to Faraday shielding
- Works across wide frequency ranges (1-600 MHz for VHF models)
To use a loop effectively, you rotate it slowly until you find where the signal drops to its minimum point, then move to another location and repeat. The transmitter lies along the line connecting these nulls. I find this technique especially useful in urban environments where signals bounce all over the place.
Commercially available antennas
If DIY isn’t your thing, several manufacturers make specialized fox hunting equipment that works right out of the box.
Arrow Antennas makes both VHF and UHF Fox Hunt Loops ($79) that work up to 600 MHz and 1 GHz respectively. I’ve used these 18-inch and 11-inch circumference loops with their offset attenuators, and they perform beautifully together.
For more serious hunters, the Sniffer 4 from VK3YNG is what members of ARDF Team USA prefer. This synthesized receiver includes automatic-ranging attenuation in 15 dB steps. It’s impressive but comes with a higher price tag.
The FoxRex144 combines a measuring-tape Yagi with an integrated compass and purpose-built receiver. At approximately $470, it’s a significant investment, but if you’re serious about competitive fox hunting, it might be worth it.
In my experience, both building and buying have their place. I started with homebrew equipment to learn the principles, then added some commercial pieces later. Most experienced hunters I know eventually end up with both types in their toolkit, using whichever works best for specific hunting conditions.
Fox Hunting Techniques for Beginners
When I first got into fox hunting, finding hidden transmitters seemed like magic. Truth is, it’s just a progression of simple techniques that build on each other. Even with the most basic gear, you can track down those elusive signals if you follow some tried-and-true methods.
Taking initial bearings
Taking your first bearing is the starting point for any successful hunt. Here’s how I do it:
- Find an open area away from large metal objects and buildings that might cause reflections
- Hold your handheld radio against your body and slowly turn in a complete circle
- Note where the signal becomes weakest—the transmitter is directly behind you at this point
- Mark your location and bearing direction on a map using a compass
- Move to a different location (ideally at a 45° angle toward your suspected direction) and repeat
I’ve learned the hard way that bearings are rarely more accurate than ±20 degrees, so I always collect multiple readings from different locations to triangulate the fox’s position. The first couple times I tried this, I made the mistake of taking just one reading and heading off confidently in completely the wrong direction!
Using peak and null methods
There are two main approaches to direction finding, and I’ve used both extensively:
The peak method involves pointing a directional antenna (like a Yagi) and finding where the signal is strongest. This works really well for initial detection but gets pretty unreliable when you’re close to the transmitter.
I personally prefer the null method which focuses on finding where the signal disappears completely. Even basic body shielding creates a decent null detection system, and I’ve found it gives better accuracy than the peak method when signals are strong. Loop antennas are amazing at creating sharp nulls with precision exceeding ±5 degrees.
Detuning and harmonic tracking
The real challenge comes when you get close to the fox – the signal gets so strong it overwhelms your receiver. I’ve used all these signal-reducing tricks at various times:
- Tune 5-10 kHz off the transmitter frequency (either direction works)
- Listen for the third harmonic (e.g., 439.695 MHz for a 146.565 MHz fox)
- Remove your antenna entirely when extremely close
- Create an intentional gap in your antenna connection
My typical progression through a hunt starts with directional antennas for the first bearings, then switches to body nulling as I get closer, and finally removes the antenna entirely when I’m within visual range of the hidden transmitter. The first time I found a fox by just holding my radio with no antenna, I couldn’t believe how well it worked – you can literally follow the signal meter to within a few feet of the transmitter!
On-Foot vs. Mobile Fox Hunting
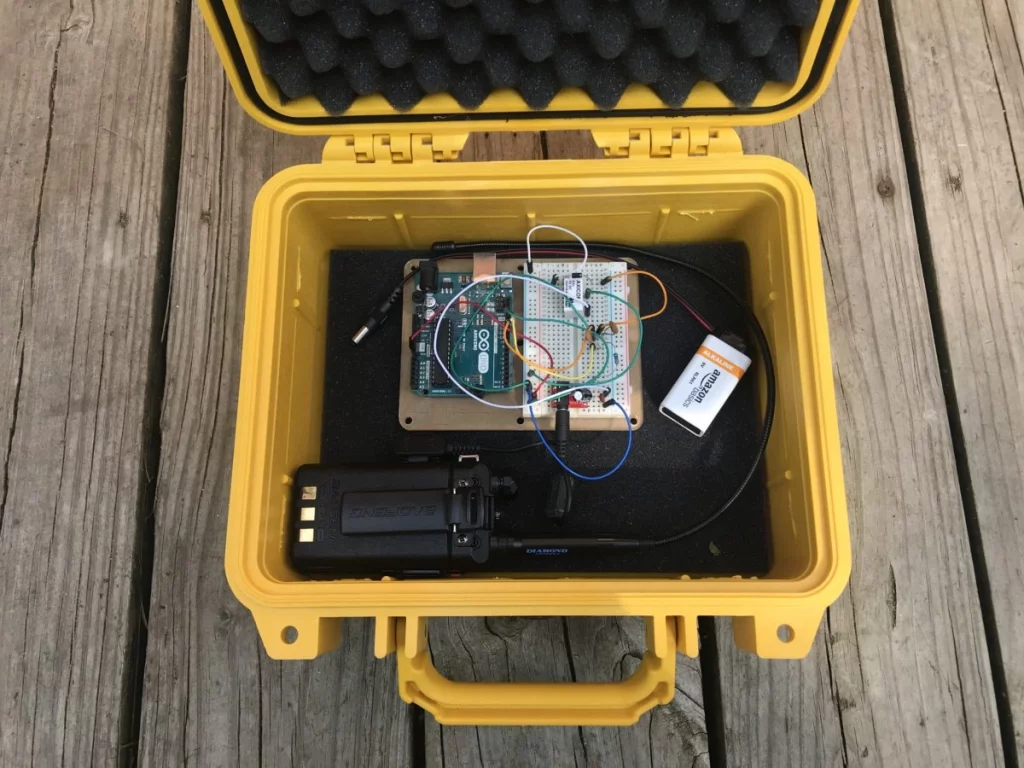
Image Source: W8WJB.com
I’ve participated in both on-foot and mobile fox hunts over the years, and I can tell you they’re completely different animals (pun intended). When planning a hunt, you’ll need to decide which approach makes the most sense for your situation.
When to use each method
The choice between mobile and on-foot hunting comes down to two main factors: how big is your search area, and what kind of terrain are you dealing with?
Mobile fox hunting shines when you’re covering large areas – I’m talking entire cities or counties. If there’s a good chance the hidden transmitter is miles away from your starting point, you’ll definitely want to hop in a vehicle. Most mobile hunts I’ve attended start with everyone gathering at a central location, taking initial bearings with vehicle-mounted antennas, and then driving toward where we think the signal is coming from.
On-foot hunting, on the other hand, is perfect for smaller spaces like parks, hamfests, or anywhere that’s no bigger than a couple miles across. These are great for beginners since you don’t need all that specialized vehicle equipment. In my experience, walking hunts are the best way to develop those fundamental direction-finding skills you’ll need for the bigger hunts later on.
Many of the clubs I belong to actually combine both approaches – we start in vehicles to narrow down the general area, then park and continue on foot for the final pinpointing. This hybrid approach gives you the best of both worlds: the speed of driving with the precision of walking.
Tools and setup differences
The equipment setups for these two methods couldn’t be more different:
| Mobile Hunting | On-Foot Hunting |
|---|---|
| Vehicle-mounted directional antennas | Handheld directional antennas |
| Roof-mounted doppler arrays | Body-fade techniques |
| Multiple team members (driver/navigator) | Individual operation possible |
| Mobile power sources | Battery-powered equipment |
For mobile hunting, you’ll need gear that works while you’re driving. I learned the hard way that you really need at least two people in the vehicle – one person focused solely on driving while the other handles the direction-finding equipment. Trust me, trying to do both at once is not only frustrating but potentially dangerous.
Using maps and compasses effectively
Regardless of which method you choose, good navigation skills are absolutely essential.
For mobile hunts, I always recommend doing some preliminary triangulation on a map before putting even a mile on your odometer. I’ve seen teams take signal readings from several different locations, mark the bearings on their maps, and identify the most likely hiding spot before they even start driving. Without this preparation, I once watched a team drive 31.7 miles to reach a fox that was only 6 miles away as the crow flies. That was painful to watch!
Even with all our modern GPS gadgets, I never go on a hunt without a good old-fashioned compass and detailed map. This is especially true for walking competitions, where you might be navigating through woods while simultaneously trying to track radio signals. Those traditional navigation skills have saved me more times than I can count when my phone battery died or when I couldn’t get a GPS signal.
Many hunters these days use mapping apps that let you track your position and document bearings in real-time. These are great tools, but I still consider them supplements to – not replacements for – fundamental navigation skills. When technology fails (and it will), knowing how to use a map and compass can be the difference between finding the fox and wandering in circles until the hunt is over.
Conclusion
I’ve been involved in fox hunting for quite a few years now, and I still find it one of the most rewarding aspects of ham radio. It perfectly blends technical know-how with outdoor adventure in a way that few other radio activities can match. Throughout this guide, I’ve tried to share what I’ve learned about getting started without overwhelming you with too much information at once.
From my experience, the most important thing for beginners to remember is that successful fox hunting takes patience. You won’t find every fox on your first try, and that’s perfectly fine. I certainly didn’t! Body fade techniques make an excellent starting point – I still use them in a pinch even after all these years. As your skills develop, you’ll naturally want to add directional antennas to your toolkit for better accuracy.
When it comes to equipment, I’ve found myself using both DIY gear and commercial products depending on the situation. My homemade tape measure Yagi has served me faithfully for years, but I’ll admit that my Arrow loop antenna has gotten me out of tough spots when precision was critical. There’s no single “right” approach here – it’s whatever works for you and your budget.
What really sets fox hunting apart is its incredible versatility. Some weekends I’m participating in an organized competition with strict rules, while other times I’m just out with buddies from the local radio club having fun. The basic techniques remain the same whether you’re in a competitive event or just practicing for emergency preparedness scenarios.
And speaking of emergencies, the skills you develop chasing foxes translate directly to real-world applications. I’ve personally helped locate sources of interference that were affecting a local repeater using the exact same techniques I use in recreational hunts. That’s what I love about this aspect of the hobby – you’re having fun while developing genuinely useful skills.
Don’t feel intimidated by those fancy setups you might see experienced hunters using. My first successful hunt was with nothing more than a basic Baofeng handheld and my body-fade technique. The beautiful thing about fox hunting is that you can start simple and gradually build up your arsenal as your interest grows.
If you’re looking for a new challenge in ham radio, I really encourage you to give fox hunting a try. Despite all the technological advances we’ve seen over the decades, there’s still nothing quite like the thrill of closing in on a hidden transmitter after a challenging hunt. The satisfaction you get when you finally locate that elusive fox makes all the effort worthwhile.
Nice general information. Thank you for sharing your experience and thoughts!
I went for my first fox hunt with a Baofeng UV-5R and am hoping to do better. How would I use a Bearcat BC60XLT in a fox hunt without a signal strength indicator though? Rely on audio level/pitch?